


ATAK Plugin
Android Team Awareness Kit (TAK) is a US Government situational awareness application, available for free on Android (ATAK). The civilian version is available for free on the Google Play store.
ATAK: https://play.google.com/store/apps/details?id=com.atakmap.app.civ
SOOTHSAYER ATAK Plugin: https://play.google.com/store/apps/details?id=com.cloudrf.android.soothsayer.plugin
Requirements
ATAK (CIV or MIL) 5.6+ (5.7 and 5.8 supported)
A CloudRF account or a SOOTHSAYER server/account
A network connection (LAN, WAN or VPN)
Our plugin is signed by the TAK Product Center (TPC) which at the time of writing means it works on Civilian and Government flavours.
It is also signed by our Google Play key so can be fetched direct from the app store.
Plugin installation
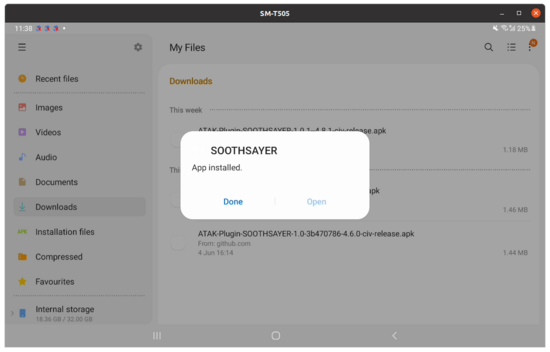
Install ATAK on your phone/tablet and then download the latest APK file from https://cloudrf.com/atak-plugin or Google Play.
You can download it directly from the device with a browser, send the file to the device via email/IM or copy it over via USB.
Before you attempt installation of the APK, ensure ATAK is running. If it is not running, installation will fail which is expected behaviour.
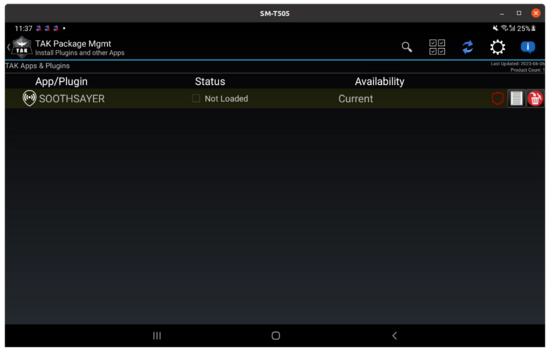
Within ATAK, open the plugin manager (jigsaw icon) and you should see the SOOTHSAYER plugin listed as available but not loaded. At this point you need to check the central status box to load the plugin. This is also where ATAK will check compatibility.
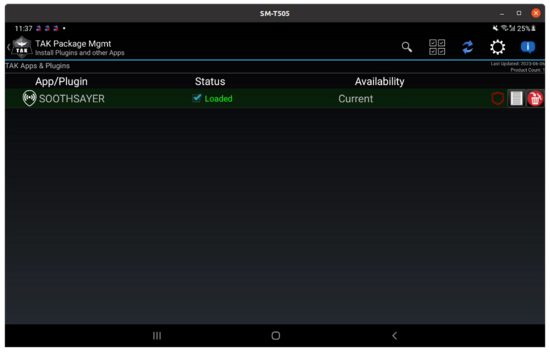
Validating the plugin version
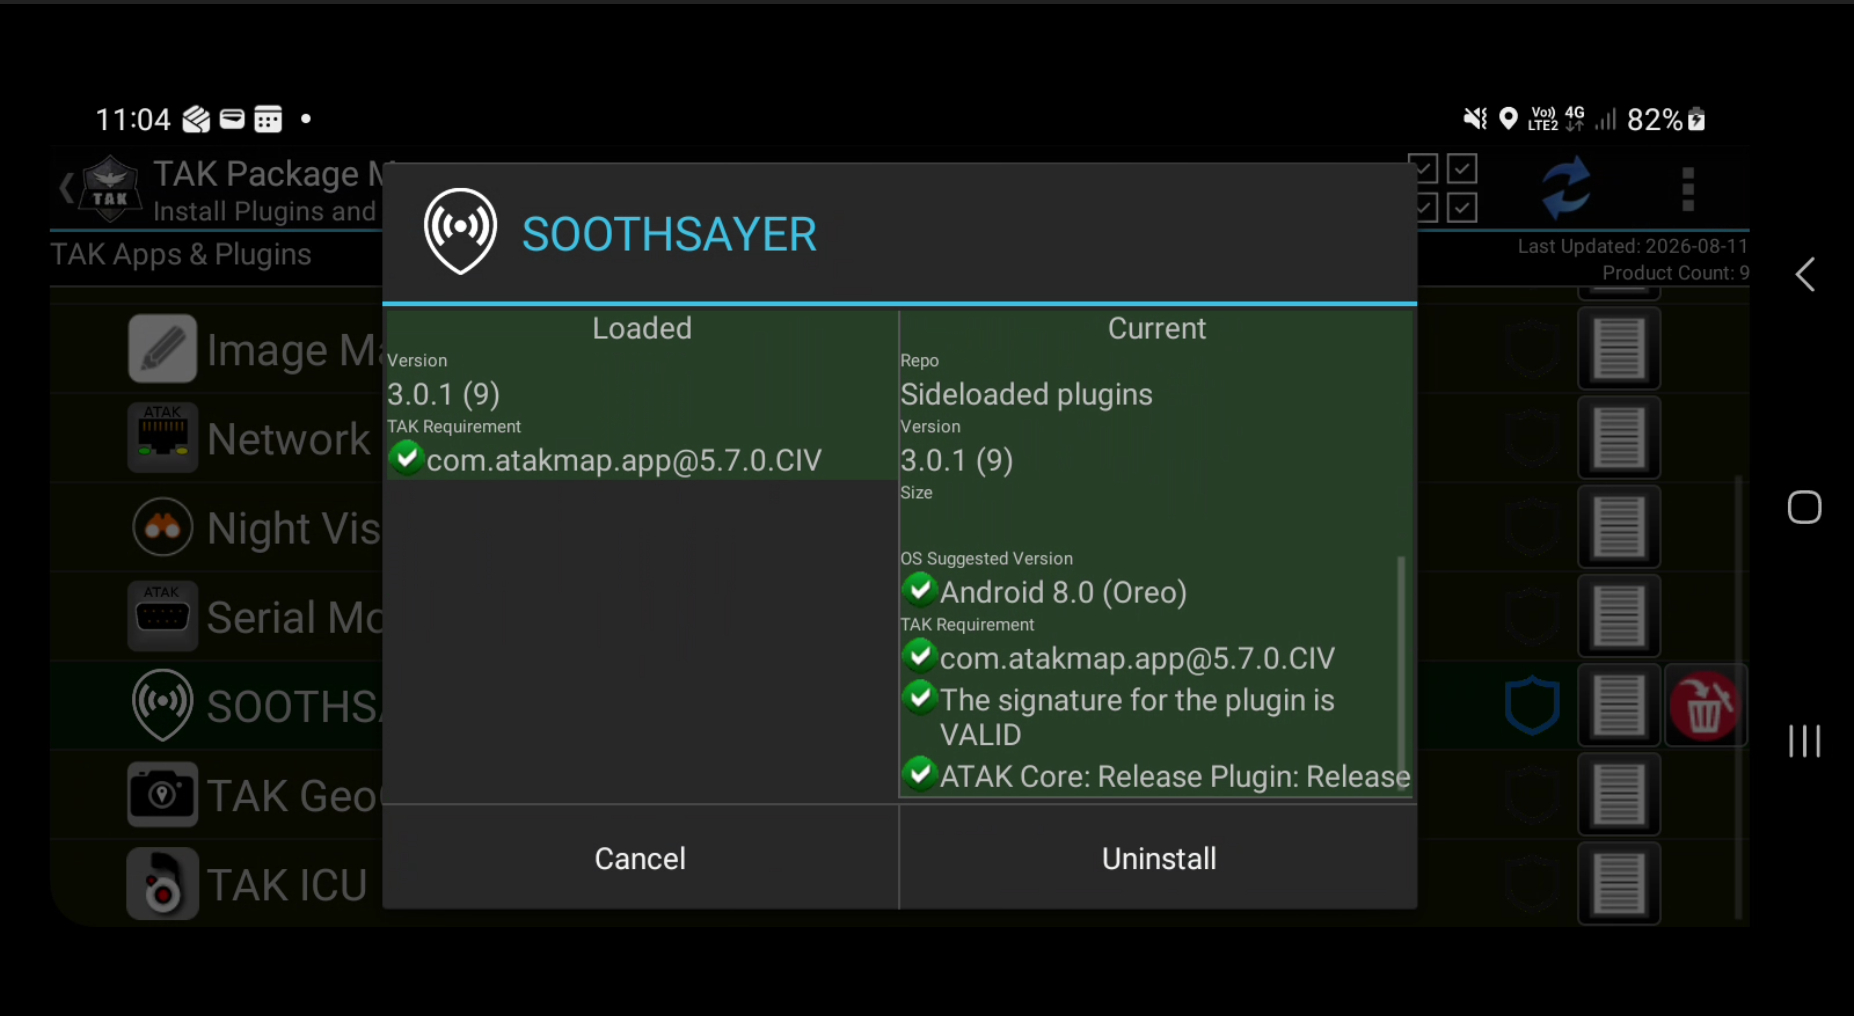
To see details about the plugin version, click the report icon to the right. It should specify the required Android OS and ATAK version as well as the signature validity which for a TPC signed plugin should be valid:
Adding a shortcut in ATAK
Once installed the plugin will be available within ATAK. To add it to the quick menu, click the pencil marker adjacent to the “Tools” label above the icons. This opens up the navigation bar to editing so you can place the icon in the main toolbar.
Logging in to your account
Find the CloudRF icon in the tools to open the plugin. You should see a blank form with a list select for radios and a top row of function buttons.
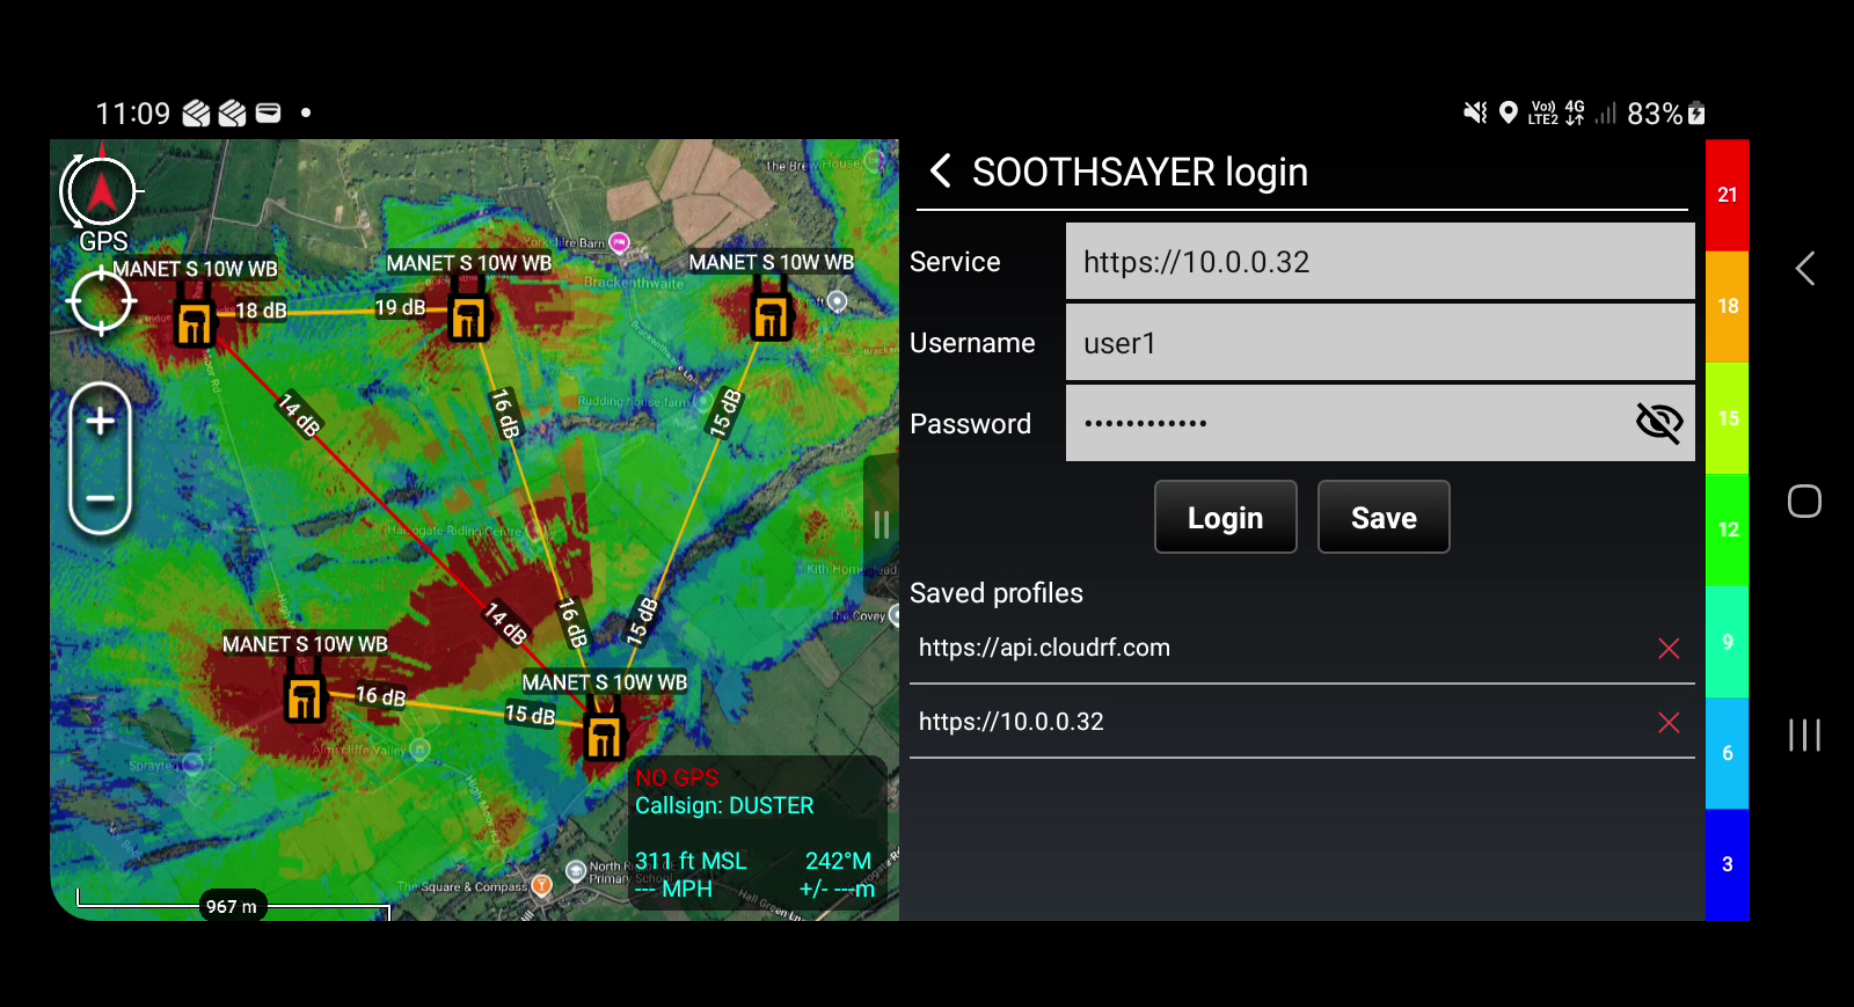
The plugin needs a CloudRF or SOOTHSAYER account to function. To login to your account, press the corner settings button and then navigate to the account login page via the account button at the bottom.
Enter your server’s address starting with https://
Enter your username and password then click ‘Login’
Service description |
Plugin URL |
|---|---|
CloudRF |
https://api.cloudrf.com |
SOOTHSAYER (IP) |
https://1.2.3.4 |
SOOTHSAYER (Domain) |
https://soothsayer.mydomain.com |
A successful login will redirect you back to the plugin start page and synchronise templates from your account to your device.
Saving Profiles
User Profiles can be saved for quick recall by pressing the Save button.
Saved profiles will be listed in the assoicated table and can be selected and loaded by pressing on them.
Radio Templates
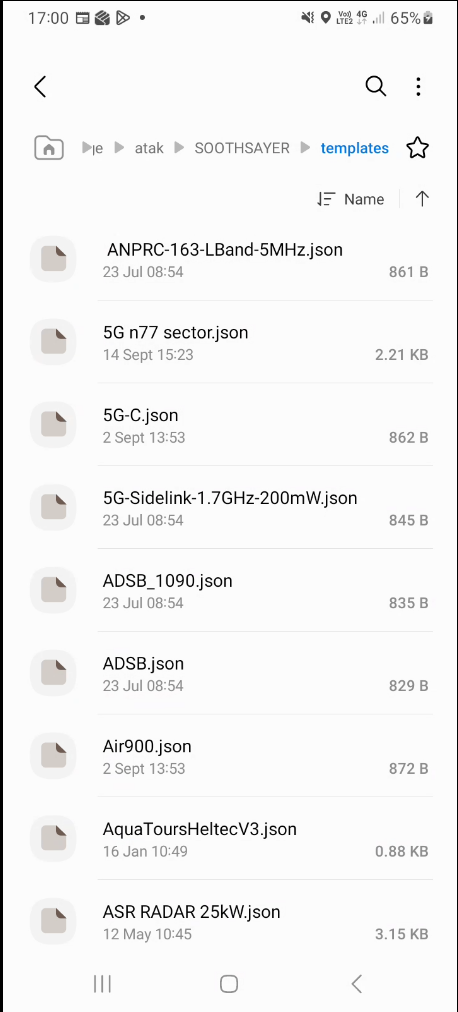
Templates in your CloudRF account are synchronised after you login.
To add local radio systems, place your CloudRF/SOOTHSAYER JSON templates in the atak/SOOTHSAYER/templates folder. You can download templates as .json files from the top left corner in the CloudRF/SOOTHSAYER web interface or create them.
A template can be edited within any text editor and must conform to the CloudRF API specification detailed at https://cloudrf.com/documentation/developer/
Example DMR template
This template is for a 700MHz handheld radio with 2W of RF power, a GPU engine (engine: 1) with the General Purpose model (#10), Deygout diffraction (#4), a 3km radius and 4m resolution and buildings data.
{
    "version": "CloudRF-API-v3.36.1",
    "reference": "https://cloudrf.com/documentation/developer/",
    "template": {
        "name": "MOTO_DMR",
        "service": "CloudRF https://api.cloudrf.com",
        "created_at": "2026-09-14T16:05:53+00:00",
        "owner": 51110,
        "bom_value": 0
    },
    "site": "Site",
    "network": "MOTO",
    "engine": 1,
    "coordinates": 1,
    "transmitter": {
        "lat": 50.705061,
        "lon": -3.046278,
        "alt": 2,
        "frq": 700,
        "txw": 2,
        "bwi": 0.1,
        "powerUnit": "W"
    },
    "receiver": {
        "lat": 50.68743612104794,
        "lon": -3.0268448767264484,
        "alt": 2,
        "rxg": 2.15,
        "rxs": -105
    },
    "antenna": {
        "mode": "template",
        "txg": 2.15,
        "txl": 0,
        "ant": 1,
        "azi": 0,
        "tlt": 0,
        "fbr": 2.15,
        "pol": "v"
    },
    "model": {
        "pm": 10,
        "pe": 2,
        "ked": 4,
        "rel": 50
    },
    "environment": {
        "elevation": 2,
        "landcover": 1,
        "buildings": 0,
        "obstacles": 0,
        "clt": "Minimal.clt"
    },
    "output": {
        "units": "m",
        "col": "LTE.dBm",
        "out": 2,
        "nf": -110,
        "res": 10,
        "rad": 3
    }
}
Example GPU ‘line of sight’ template
This template uses the more powerful GPU engine (engine: 1) to model line of sight out to 3km at 2m resolution (if your area of interest has 2m LiDAR). Surface model DSM is enabled (elevation: 1) and clutter is disabled (buildings: 0, landcover: 0).
{
    "version": "CloudRF-API-v3.36.1",
    "reference": "https://cloudrf.com/documentation/developer/",
    "template": {
        "name": "LOS",
        "service": "CloudRF https://api.cloudrf.com",
        "created_at": "2026-09-15T14:23:37+00:00",
        "owner": 51110,
        "bom_value": 0
    },
    "site": "Site",
    "network": "CloudRF-API-clients-DEMO",
    "engine": 2,
    "coordinates": 1,
    "transmitter": {
        "lat": 53.120556,
        "lon": -4.019496,
        "alt": 5,
        "frq": 2400,
        "txw": 5,
        "bwi": 0.25,
        "powerUnit": "W"
    },
    "receiver": {
        "lat": 38.91089045662402,
        "lon": 1.4478719917672556,
        "alt": 2,
        "rxg": 2.15,
        "rxs": -99
    },
    "antenna": {
        "mode": "template",
        "txg": 2.15,
        "txl": 0,
        "ant": 1,
        "azi": 0,
        "tlt": 0,
        "fbr": 2.15,
        "pol": "v"
    },
    "model": {
        "pm": 2,
        "pe": 2,
        "ked": 0,
        "rel": 50
    },
    "environment": {
        "elevation": 1,
        "landcover": 0,
        "buildings": 0,
        "obstacles": 0,
        "clt": "Minimal.clt"
    },
    "output": {
        "units": "m",
        "col": "LTE.dBm",
        "out": 2,
        "nf": -114,
        "res": 2,
        "rad": 3
    }
}
Template limits
As a server based system, limits for APIs and accounts are set at the server. For premium users this means a 500km / 310Mi radius and a resolution between 1m / 3ft. The combination of these two will determine the resulting file size. The API will automatically reduce ambitious parameters to fit within commercial or physical limits.
As well as memory, a large layer needs more bandwidth to communicate and is not recommended for a mobile app. You should aim for smaller layers which can be generated and communicated quickly. You can still do a large radius eg. > 100km, but will need to offset the resolution to keep the size less than 1 mega pixels (1000 x 1000px).
As a rule of thumb, multiply the radius in km by 2 to get the resolution in metres
The following guide is recommend for practical 1MP ATAK templates:
Desired radius km |
Recommended max resolution m |
|---|---|
1 |
2 |
2 |
4 |
5 |
10 |
10 |
20 |
20 |
40 |
50 |
100 |
100 |
200 |
150 |
300 |
Giant airborne calculations
The API can model out to 500km radius for aircraft. If you set 500km as the radius with 100m resolution you are generating a 10k x 10k image measuring 100 mega pixels! This will take a long time to make, a long time to download and then will crash ATAK, and any other Android map for that matter. To do this scale of calculation, use the polygon focus tool or to see the whole area use a resolution of 300m which makes a more digestible 11MP image. The radio horizon for an aircraft at 33,000ft is 357km so bear this in mind.
The Polygon tool can be used to reduce the overeall size of the displayed layer if you only require a specific study area. It supports fast high resolution calculations for distant sites.
Custom icons
You can insert a small custom icon into a JSON template as a base64 encoded PNG with the “custom_icon” value. The example JSON template below has a name of CUSTOM_ICON with a PNG radio icon and a GPU engine defined at the top level of the template. Keep the PNG images small (~ 48x48px) to keep memory use down.
{
    "custom_icon": "data:image/png;base64,iVBORw0KGgoAAAANSUhEUgAAACAAAAAgCAYAAABzenr0AAAH4HpUWHRSYXcgcHJvZmlsZSB0eXBlIGV4aWYAAHjarZdpciM7DoT/8xRzBG7gchxwi5gbvOPPB0py2912jx3xVKFiicViAUhkAnL7n/8e9x8+MbfsstRWeimeT+65R+Wi+cen33Pw+Z7vJz5v8fvDvHu7EZlKjOnxs+pzvTIvvx54vSOMj/OuPe/E9tzoeeO1YbI329vWeyOZj4/5kJ8b9f24KL3V96aOp6nzufCa8vzO/fAwPF9mv937iVyJ0hJWpRh3Yvqe28OCZN+UlLFxjqnZOu5rkiSOIaeXrwTkg3uv0fv3AfoQ5NeV+z36b1e/BT/qcz79FsvyjBEXn94I8nnwb4jfvTi9WRQ/3qjrDeE/gnzOaufsh3eaCxEtz4zy7hUde4aFg5Cn+1jhqHyF63qPztG8+gnky08/OGboIYLKcSGHFTScsO84w8TEHHesjDFOYLG5lmrscYJYAByOcGJNPS0QjGnG7QA0p/hmS7jv7fd9MzTevAJLY2CzwCNfHu5vN39yuHOmhSj49hYr7IqWuZhhyNmZVQASzhM3uQF+HU/4/bv8IVVBUG6YGw6qH48thoRfuZUuzol1wvigUHDA/diAEPFuwZiQQMCXkCSU4GuMNQTi2ABIsTymHAcIBJG4MDLmlEp0NUIZ3s0zNdy1UWKJNo02GX1SSRVselLAylnIn4qS9axQLItIkSrNSRctqeQipZRaTOS0ppqr1FJrbbVXbanlJq202lrrTXvsCQ2UXnrtrfeuGp3yImUvZb0yM+JIIw8ZZdTRRh86SZ+Zp8wy62yzT11xpYVMrLLqaqsv3cFtlGLnLbvsutvuWw+5dtLJR0459bTTj76h9kT1j+MHqIUnavEiZevqG2rMulpfWwSTEzHMQCzmAOLVECCho2HmW8g5GnKGme+mchIxUgwbt4IhBoR5hygnvGH3C7lv4eakfQu3+P+Qcwbdv4GcA7o/cfsEtWV1bl7EHiy0mPoE+1ijsTm+3nP6zhi71LmTnLxWnb1myuSQvmSm5cpaofi0p3xzty9G942FIKyn4nHfRBifdNQ9qG2L2M5SF7ghtYdgYfNJKsgzoRpSRoyD2JMIR/Cib6kaVm3kTUm56gWd2imLoNvMEGded9k4uvF99nikDjaf68hIGZzqGCtkCXnmO4gV/D9G99WNINun3IdP6+iYYQ9q5JQ4GuEuulYkT4n/XvyKWh1NBvVBdElRDVqhxEKyyAroYGI2cIDc7LpKxw/6nSD2RBLJSrXiRiBhHXGzAK6xG9FcykhKmlSadf7bo8XokHrQtbaw8oBlXqe93865WUlVbOstiPaRD8nf7D0IbecxAJEFEC4dG5OlknpwzfC/9yM9CSwoRCKEwU9YBZzsh6QslWru0x9Q4qElNrkvQv3pSPz5HmhBtqxrfvJbx0LZnRDQoJ2XjZbNoYpxVbGpkf0J2xe6sZAIvKJexG3Z6C3bwCGwMioZWJxmX5RtSE6dwWBQ7fYW4GDLonsJSzs7npLXlyF3X9ywyNexDYohKeIDssabwZ4QT9qZVSaCBgtwOulwVgK6DsTM+w04aAzSxDVcUdXNSgb6nDIMC86lK08ms38tlMp8GsvhfpCkoDHNn6xjWM9OPIpxVq1x/s4I++PYdejRYBddu5EwXbRxBQthcsGsoLuoUZlm8ggSWbFgDmNGPpdrnazbgHYduUPxUQrFYa7i78Ih86yyVwmLcgMcom2zJ2jwwIZO6oY+PKk/8+ThyMQRMsEuXJ7eTCY9hLOxdA6agvQwXkw75M68/ABVgwPm+EphQ9VqJNkJNu1OsOA/IKD+kvr4ULY8PdkGuBYWhnV5RQRRQ6NH7K+sd9+mx0nTnl6mpVcWSeICG5dlc/Qu0ZRsjYMqaJWomSdTKlnB8LsnEDWvGrEry8MRNp3mCE0Epcyog6NcXkeK1VFaShzABQKgwQhCTf6LJrnPCfJLo6x/82ZE6zI6Z/a8wZcHBgm0MMVKNiaMrpch+uTI3924eJhUURM58/dlSnYdQAyBRJ1XiHQZkusy9bAwpx8USKSa7GrQhHbBBBwyG0Gh8jKx3VzRX2zCBVHUxwRboHS2gbAivoU/ftt6EX9zI+HKsQFX4k2taQ69XFnGmfR0xTwxSFi4dxnNlVuNIUlOPy769CnmSuJiuluMolq4b9SNRnNDD52QxBsvt3VIaNWgLbqQQM8ePziSgrNakcxtA4WOKl9P0L+0ED8k0Jts2V9mTkDvSe9S5UTavRWGabp+nUdfjfQJcAVMSTTqeQsUiEvuKo6swrVGPRa0nZfT1EpN8NmbJpkakXNvJOnmAR2mDTRwJsB7AGFwVkKtAFbRShkE7WUqCc60mVQqPLEmMC67uD1a+pTX7u+EVwsEEcFCmGIm+ytNFLxWLPvVmlYrx452Q5qVbfOMelga80/9rc+sIx8T8NEwG+FQu9Jp4pJ1j7iB7Pp4nLAjtX/jBpm7efB0SIig/ER2qSJv+hvRXwhHtbLMoqRfAMRTpyMyj6LqsK6NAr6xIxvyeEM6WNs+nDUmlVvkEGEkF6kncG1kSgWViH3pwQYPwqoQr+hW61AouQf60yUDBVLlvk3vT0Zk/EbAqOJMOTZgcyftYk0cP+XxkwJ2w9XptKSx/la0UyEX3RhUgloJyda+kFqijrFM5Niy/Rr2v8k6wtZ0WKe7/qpLib8Xndbvf+u2y/C+p/+xAAABhGlDQ1BJQ0MgcHJvZmlsZQAAeJx9kT1Iw0AcxV9TpUUqDmYQ6ZChOrUgKqKbVqEIFUKt0KqD+egXNGlIUlwcBdeCgx+LVQcXZ10dXAVB8APE1cVJ0UVK/F9SaBHjwXE/3t173L0DuGZV0ayeMUDTbTOTSgq5/KoQekUYUfCIY0ZSLGNOFNPwHV/3CLD1LsGy/M/9OfrVgqUAAYF4VjFMm3iDeGrTNhjvE/NKWVKJz4njJl2Q+JHpssdvjEsucyyTN7OZeWKeWCh1sdzFStnUiCeJY6qmUz6X81hlvMVYq9aV9j3ZCyMFfWWZ6TSjSGERSxAhQEYdFVRhI0GrToqFDO0nffzDrl8kl0yuChRyLKAGDZLrB/uD391axYlxLymSBHpfHOdjBAjtAq2G43wfO07rBAg+A1d6x19rAtOfpDc6WuwIGNgGLq47mrwHXO4AQ0+GZEquFKTJFYvA+xl9Ux4YvAX61rze2vs4fQCy1FX6Bjg4BEZLlL3u8+5wd2//nmn39wP57XLd+8ZLEQAAAAZiS0dEAP8A/wD/oL2nkwAAAAlwSFlzAAAOwwAADsMBx2+oZAAAAAd0SU1FB+cIHBQ3LSPd1ZEAAAWWSURBVFjDrVfdixxVFv+de2999XTPJNNtME4yE9BJCHlRTER3wRc3D/vqsyzs/gO7BFYQJB+u7Bp9UBSR4Iu+BR8EEQQfZBcE0UUTYYNmkujmY5PMjPPRPfU1XVX3nH2oqp6el9FUvHTX7a7uW+d3zvn9zrmXRAT3MqIwxIkTf/nYGP3g2nr/w/PnP/gH7mOYe13Q7nRw5+7dJy9dutybmdl7Dfc5fhGAl186+dYPP9747YG5mTOnzvz9ozhKMhCQ5zkBwL8++3Ri19SuYZEP+ehTT/Pzfz0x3W538pOnzoQ/92z1SwCkafrMrVs3H/vu+4XfXLr0HwoCPxMWTE1NJgDw1b+/Pv/m2+9EFy588+jnn//TFear/fX1ldfOvvz7XyUCU1NTXxZFfjiMoqNnTp961w+8A67rIEnS5/70xz98O9npHI7j2F1dHzzxzdcXzGAwmNbG4fV+f/hzz6adSPi3l148snh38YTnt55duHx5l2WG67rQWiOOY2RZDgEAAYqiQK+7CzP7Zy+mcfLYdLcrcwf2n/zf7aV3Xz376lIzAKdf+MJafmpxeQUiAhFGkiSwLGAWEIDvF67hkYcPwHMdbA6HyPMCPy3/hMOHj2BldQlpmhWPHz126Owrr/x4zykwxuXCpgCkAiAAKTDniOMERhtoraG1hjEGbWMgIoiiBFeuXoXneyDArK2udgHcO4DC5v2bt25jc3MIrTV83wcABL4PAsF1HRijQWUWAJFyhgAEAAQWxtLykmpEwjwvZLARIo5T3LxxCw/s2QPPc7C8vIyH9u6F0gqO1lXocyRpCt/3MRhsIAgCEAEiwOLikm0kw8D3EwUCM4OFQQRYtugPNrA5HGJzc4j/Xr+OOE6wsrqGywvXEEYxwjAEqFyXZzm6vS41AjDMhqHS5V+01iBFMNqArQWBSl6UXAYqb4WrO0SwlgEC5ucPNqsDwgKlNECENEmhKqPMdY63hqMNXMeB1ho1DZRSUEQQ5rBRBCyzAAKCIC+K0kuuZVuCgRCk+j3LM1i2AJURUYpARIjjxDaKgNI6IyIIA8wMotIYC6MifR398jOokkPlgLX1uxkJCUiVUmBh1PVKRKr8cy2+seuIESAQ8rwoO2h7QhpFwFqbEBGYbUUyGSNe6TVVtrcX1DJSWhuoMm3cjAOFLcbryqga1jME49fqNVKBMQpEwJ07t/NGAPxWIIoUQASpWF33DpGt6lcCGvs+lggBoTM52Ww/4DjuEFR6Uz6vYj4INKq/VNmUbaV4tASCXm9PMxIO+v0+VblXSm03oNSWozUn6gQQjWYRwHHdZgCybEhECoW1cIwBM29jm0iddxmTYakSIhrJ9vjx3zXjQGdyKiMQbFHA83xYa6t00HaPZUuMPMYRqjrisWPHokYANtN0AAiYGcZosOURw8c3Msx2xAMRrpNfRgKCa1cWmqXAWlsQ1d1QRg2HQBDmbVWvjoRUOyVVsZCUwsy+fc1UEAQtISJopWALCyIFZgulVdmQqgJRE3XEC9BIkkZr7HT22ZmEeZ4BQKsVIAg8eJ6LwtZAGMwy6o4iZY9g5i1ugDDRbqPTaTdrx1qpIgg87J7eDWUMjDZoBQHa7dZWWR4D0GlPQCnCxERrxBPfD9BpNwRQFMUGkUIraKE73fvEWnsky7PpublZiuO4lWWZKo2WUrW2KOWHLZUUeTZofDCZ7vWuLC3e/UhpdTyKoyd8P2g5xlHGccJutxevra2BupS3gmAlL4rJMAzdKAr3hVFS7iIEsNZ+1/hgsiUz4NTpF2dv3rgxr7U+OMyygxCZL4r8EEHNGcesDNPN3V7gr25sDGbCOAVA8D3vh9n9+58+d+7cnfsCsNO4ePGief/99x6JouhgFEeHtFLz/Y3wQdfxZG5u9s9vvP769Z3W/x+NojQvpvBOhQAAAABJRU5ErkJggg==",
    "template": {
        "name": "CUSTOM_ICON",
        "service": "CloudRF https://api.cloudrf.com",
        "created_at": "2023-09-05T20:40:56+00:00"
    },
    "site": "Site",
    "network": "DTC",
    "engine": 1,
    ...
Using the plugin
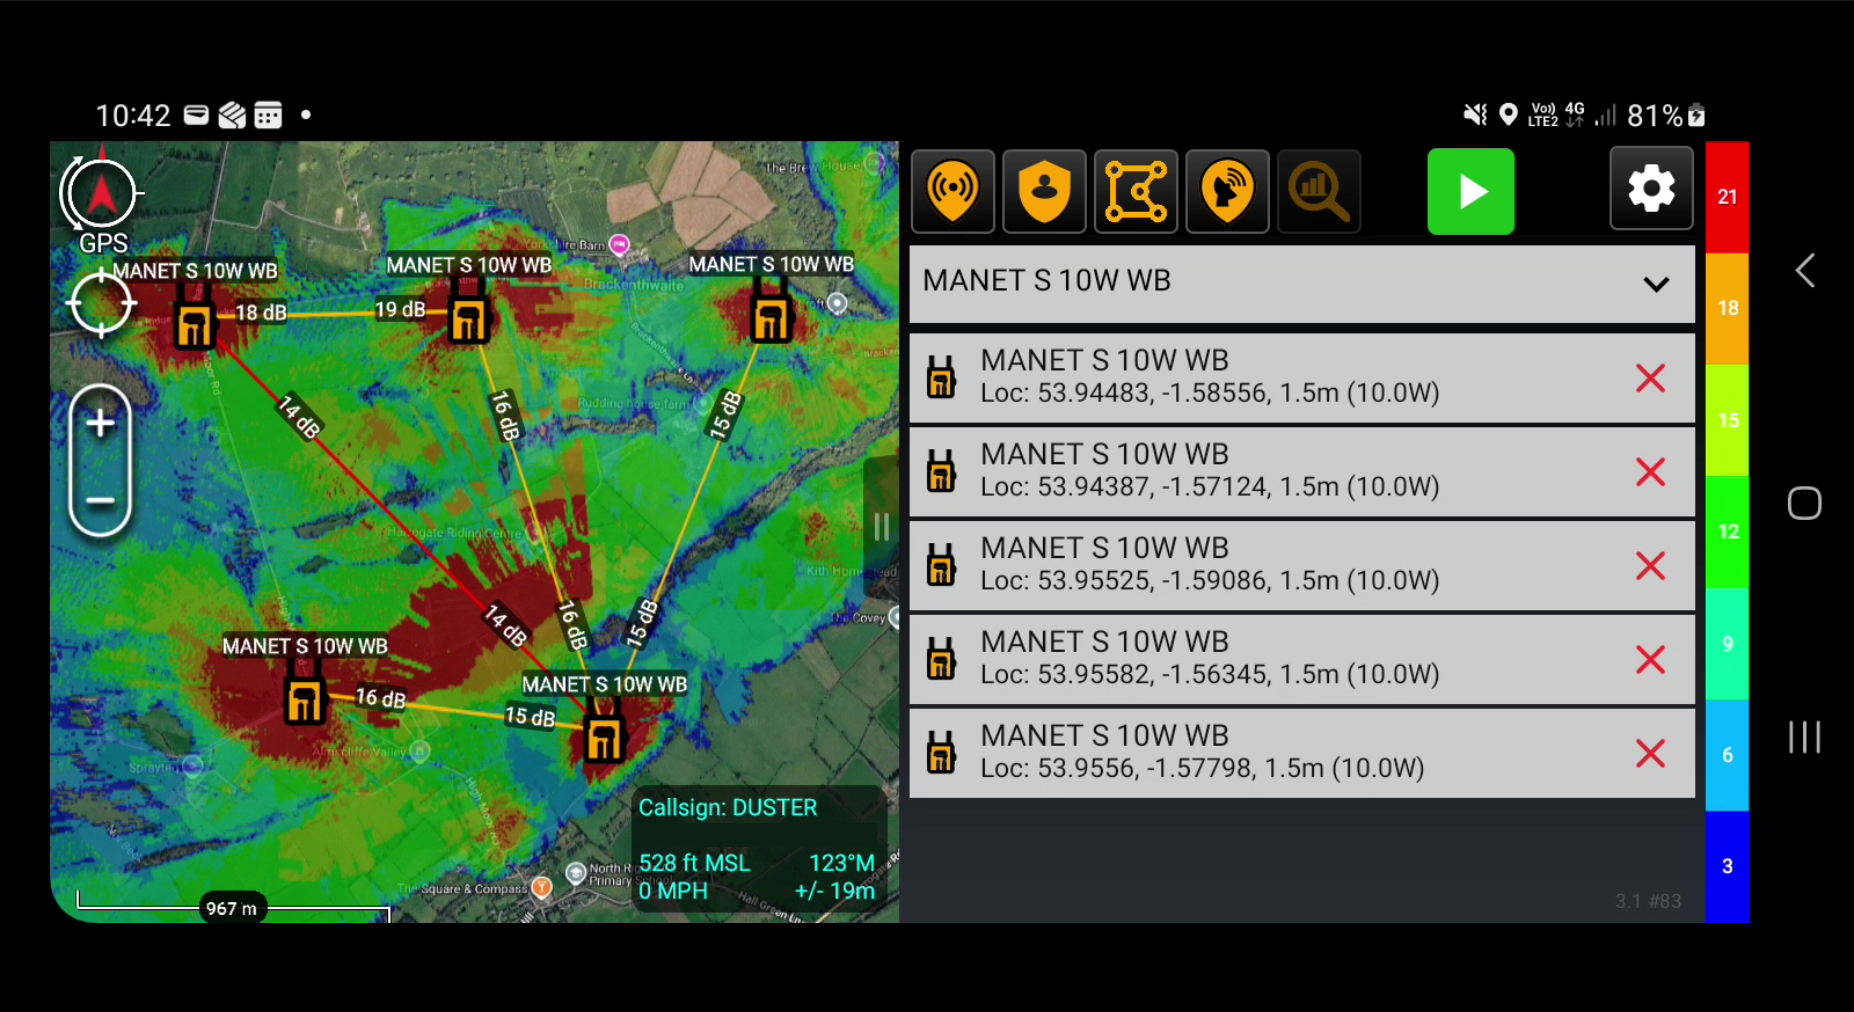
To add a radio to the map, choose the system from the drop down list, then click the SOOTHSAYER button above it. A marker will be added to the middle of the map.
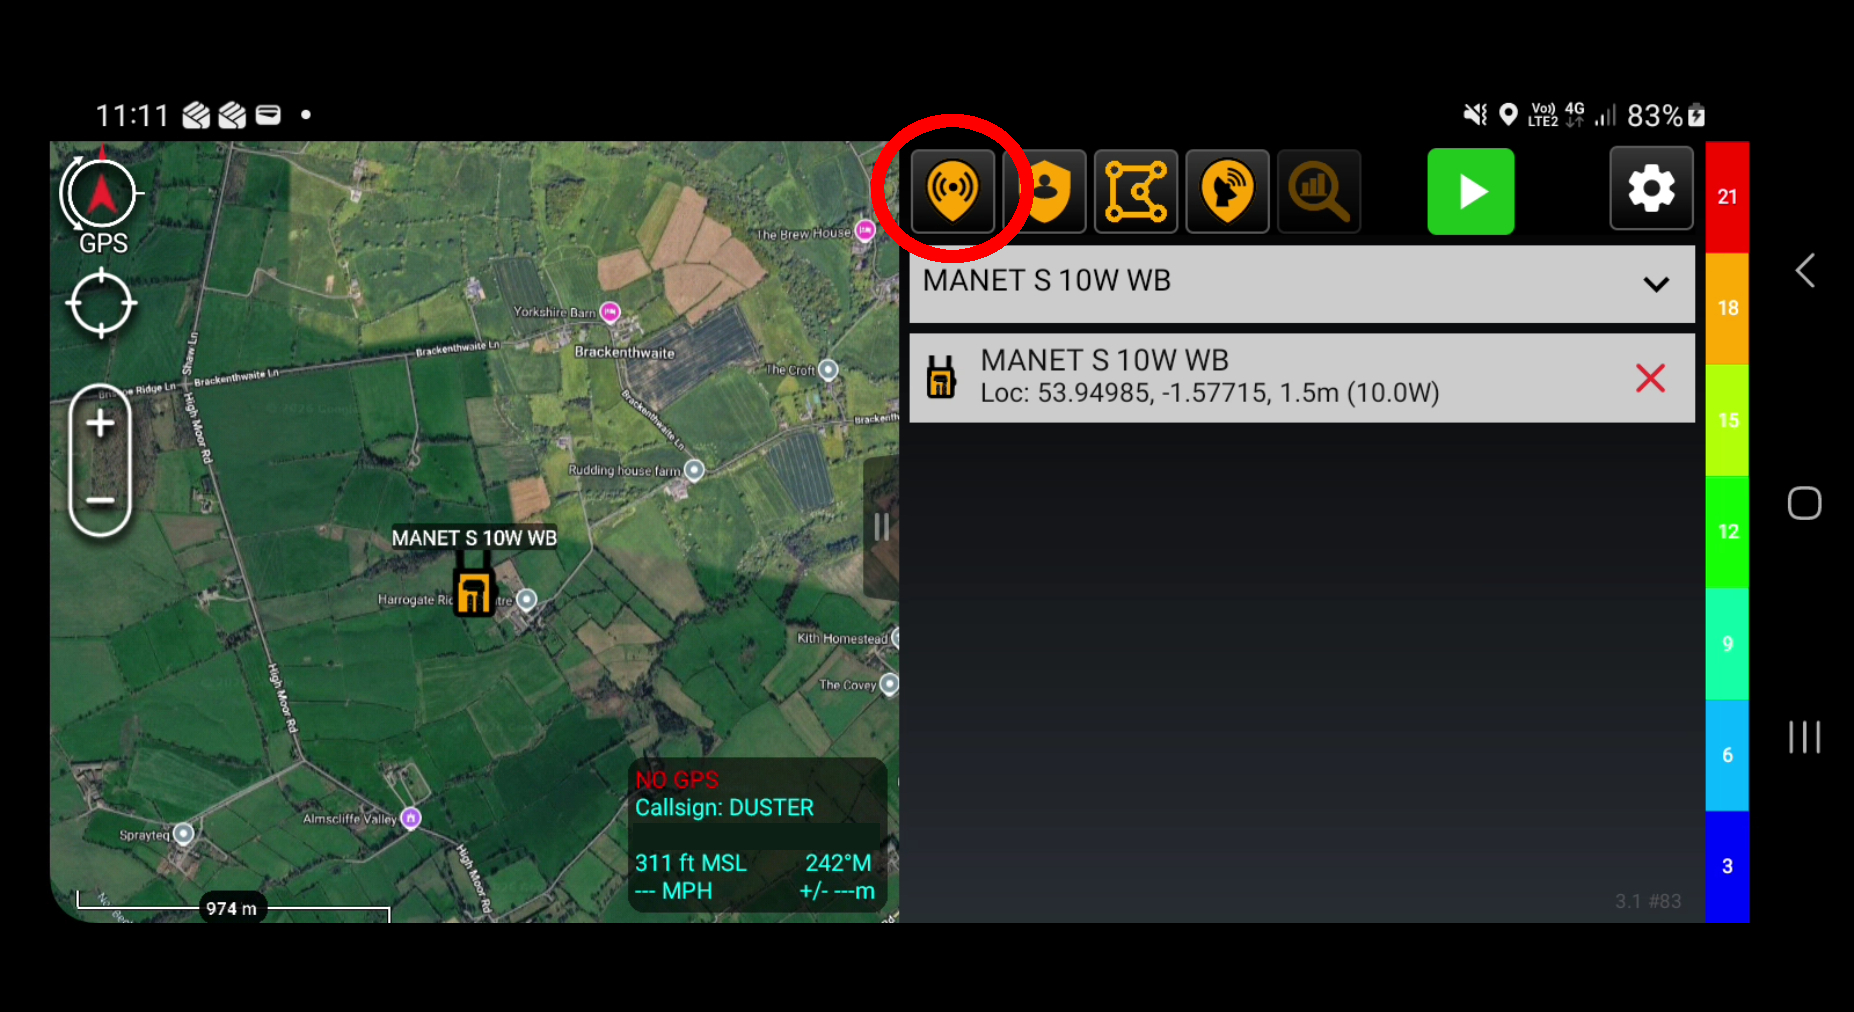
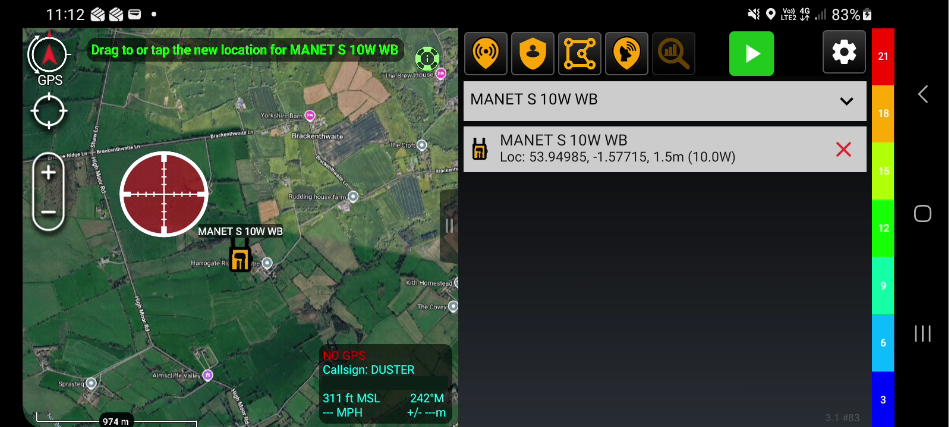
To trigger a calculation, you can press the green Play button or press and then drag the marker to the desired location using a “long press”. A progress spinner will appear and the request will be sent to the server. After a brief delay, an image will appear on your map and be listed in your layer manager.
Settings
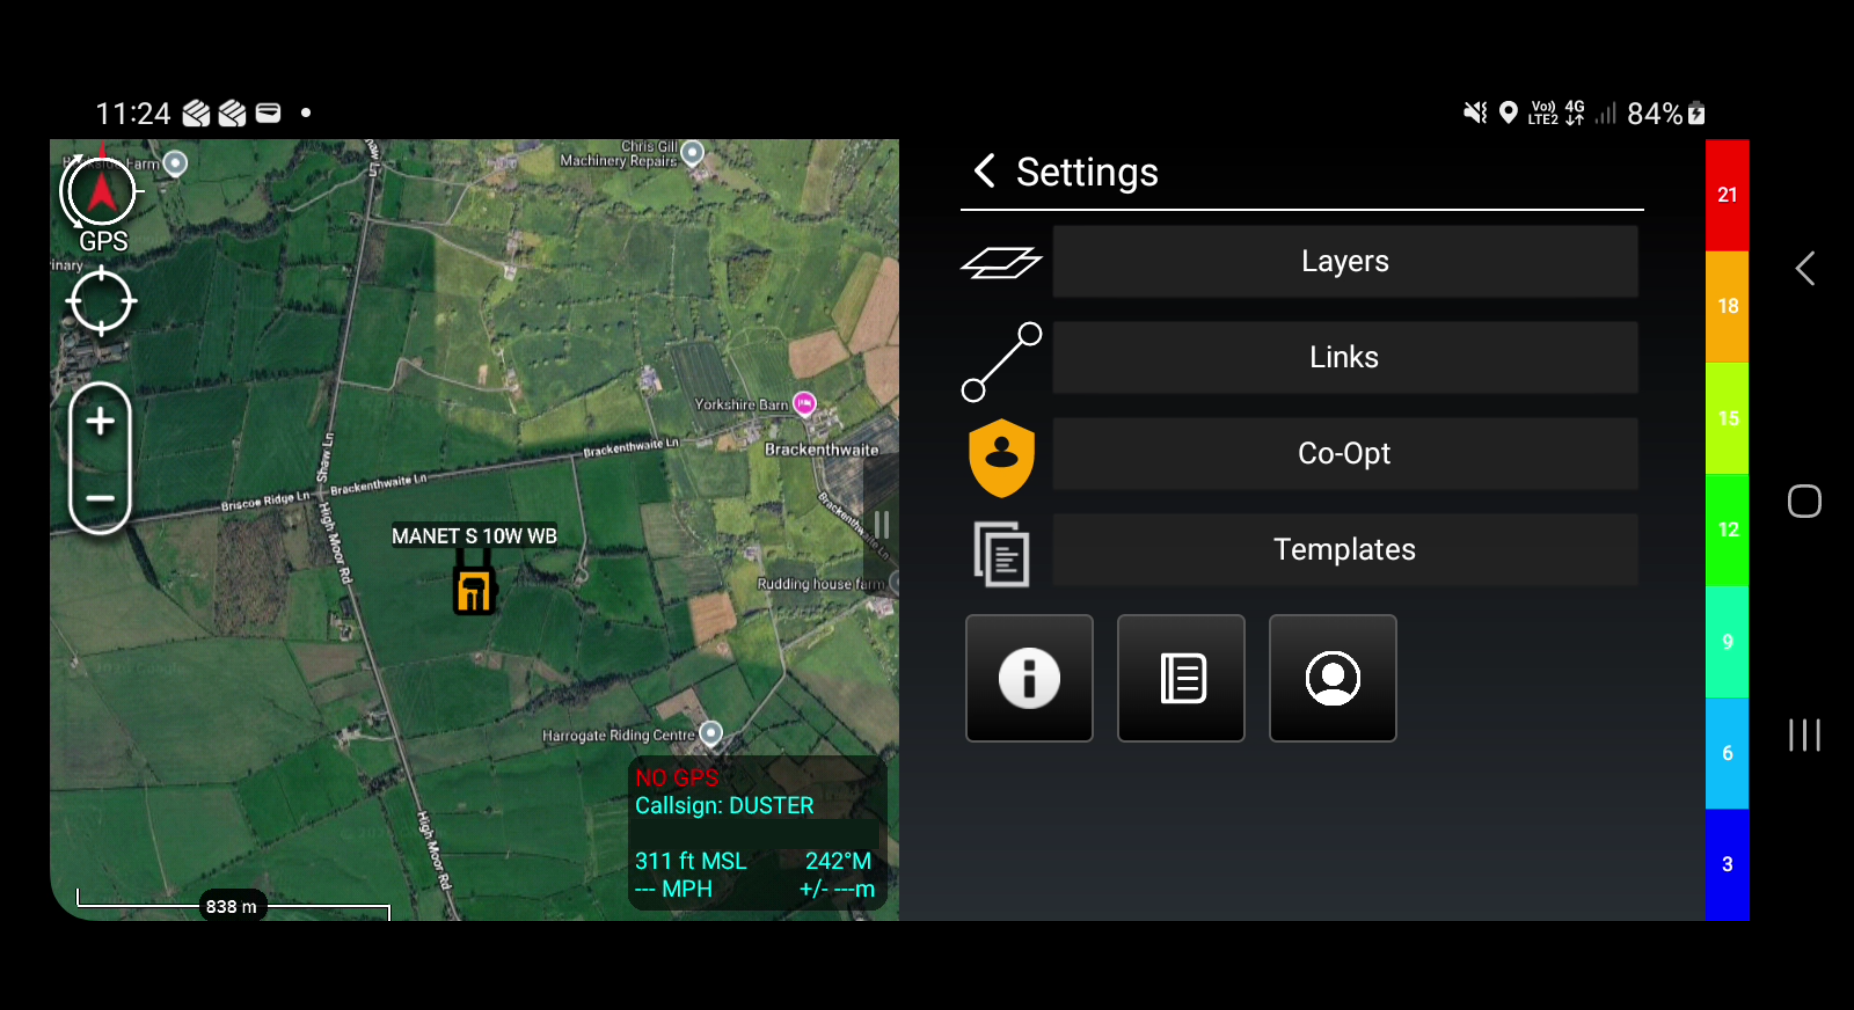
The plugin offers several settings menus, grouped by its main features:
Layers – Manage how layers are generated and what’s shown on the map.
Links – Choose styling and units for point-to-point links.
Co-Opt – Configure calculation and refresh settings for live data.
Templates – Manage local pre-defined radio settings (Templates).
Layers
Coverage layer
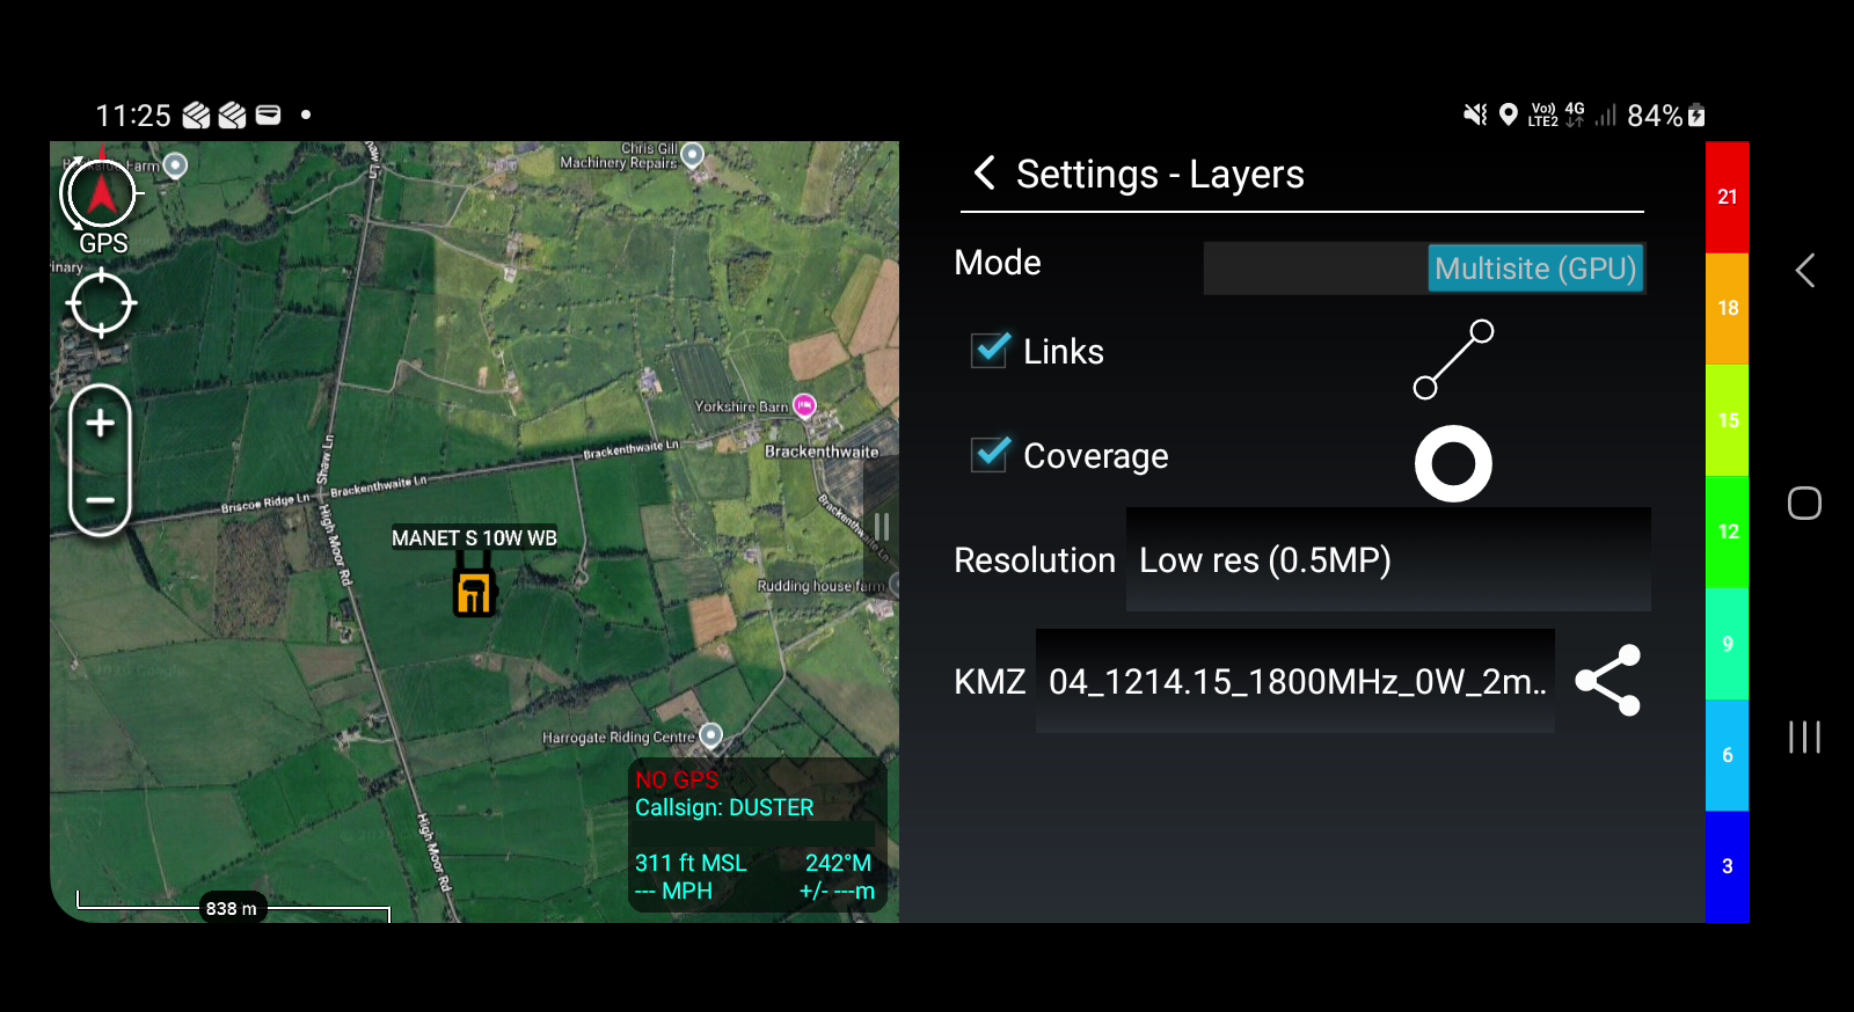
Single site mode places each radio coverage as a separate image layer. This can get busy quickly with many radios but can be managed via the native layer manager.
Multisite (GPU) mode is a more powerful capability which models all radios together to show network coverage. This updates one “MULTISITE” layer only.
Multisite requires a Soothsayer server with a GPU or a CloudRF subscription
Links
This checkbox will show or hide RF links between radios. This uses less bandwidth than coverage layers, and is faster for quick checks.
Coverage
This checkbox will show or hide RF coverage. This can be useful to save bandwidth if the interest is links.
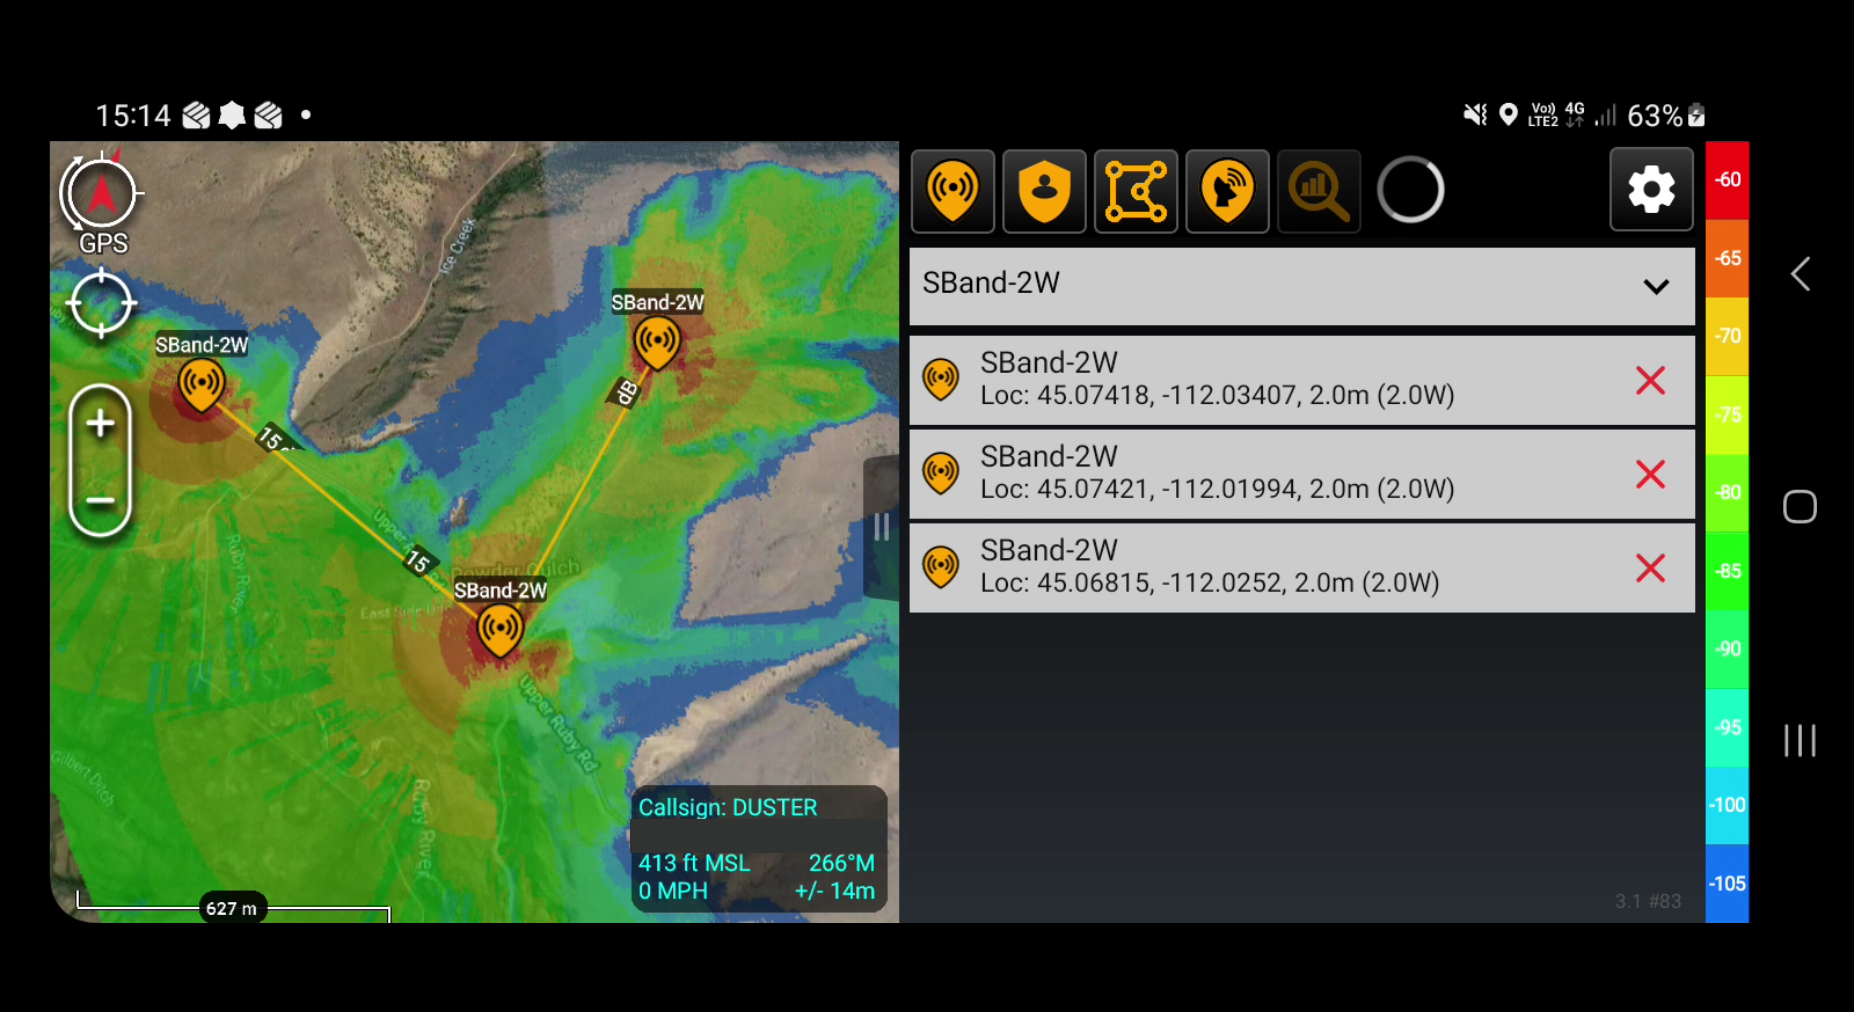
A multisite layer is a single layer which is available in the ATAK layers menu under the “SOOTHSAYER” category. It can be hidden or deleted to suit.
Resolution
Resolution for coverage calculations can be set to various levels to suit bandwidth and detail requirements. Low resolution is recommended for beginners. High resolution should only be used if your network has sufficient bandwidth or the server is local.
KMZ Export
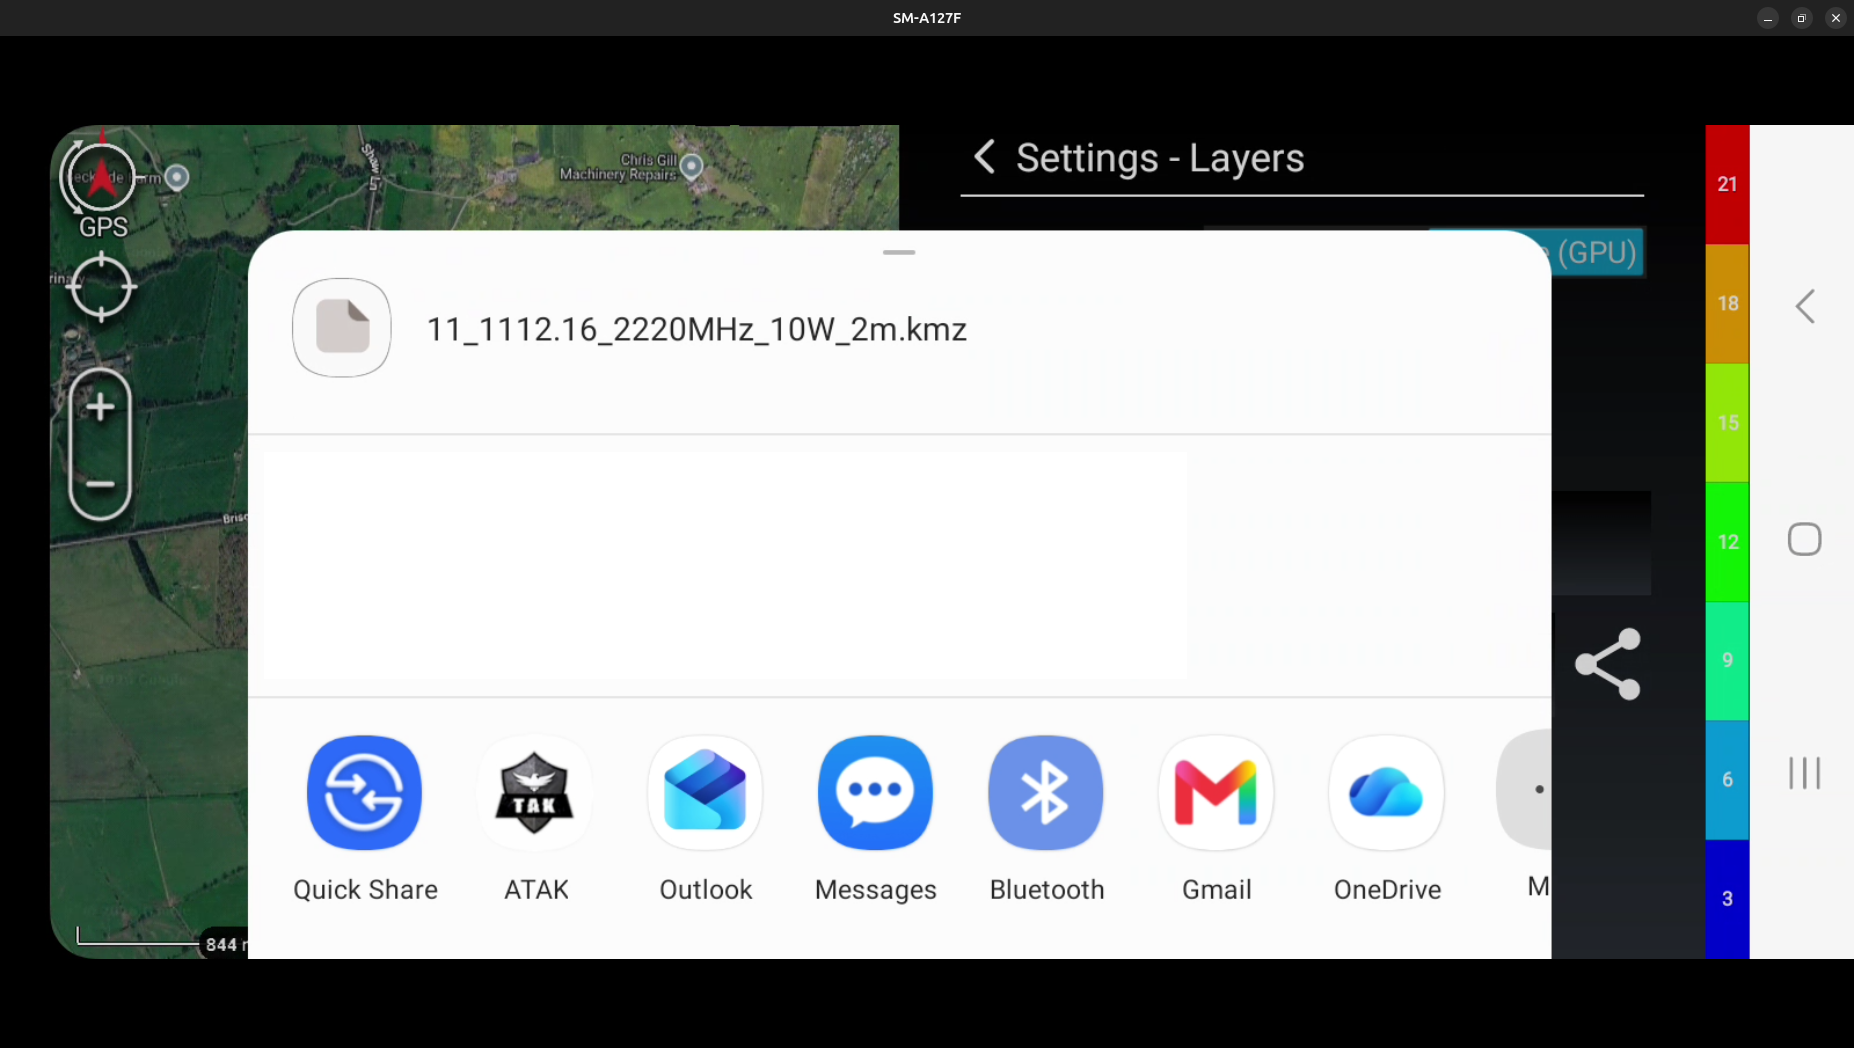
The share button on the KMZ row allows the KMZ to be sent to other users or applications the EUD is connected to i.e. Bluetooth, Email, SMS. A KMZ file is an open standard viewable in many mapping apps and the recipient does not need Soothsayer to view it.
Links
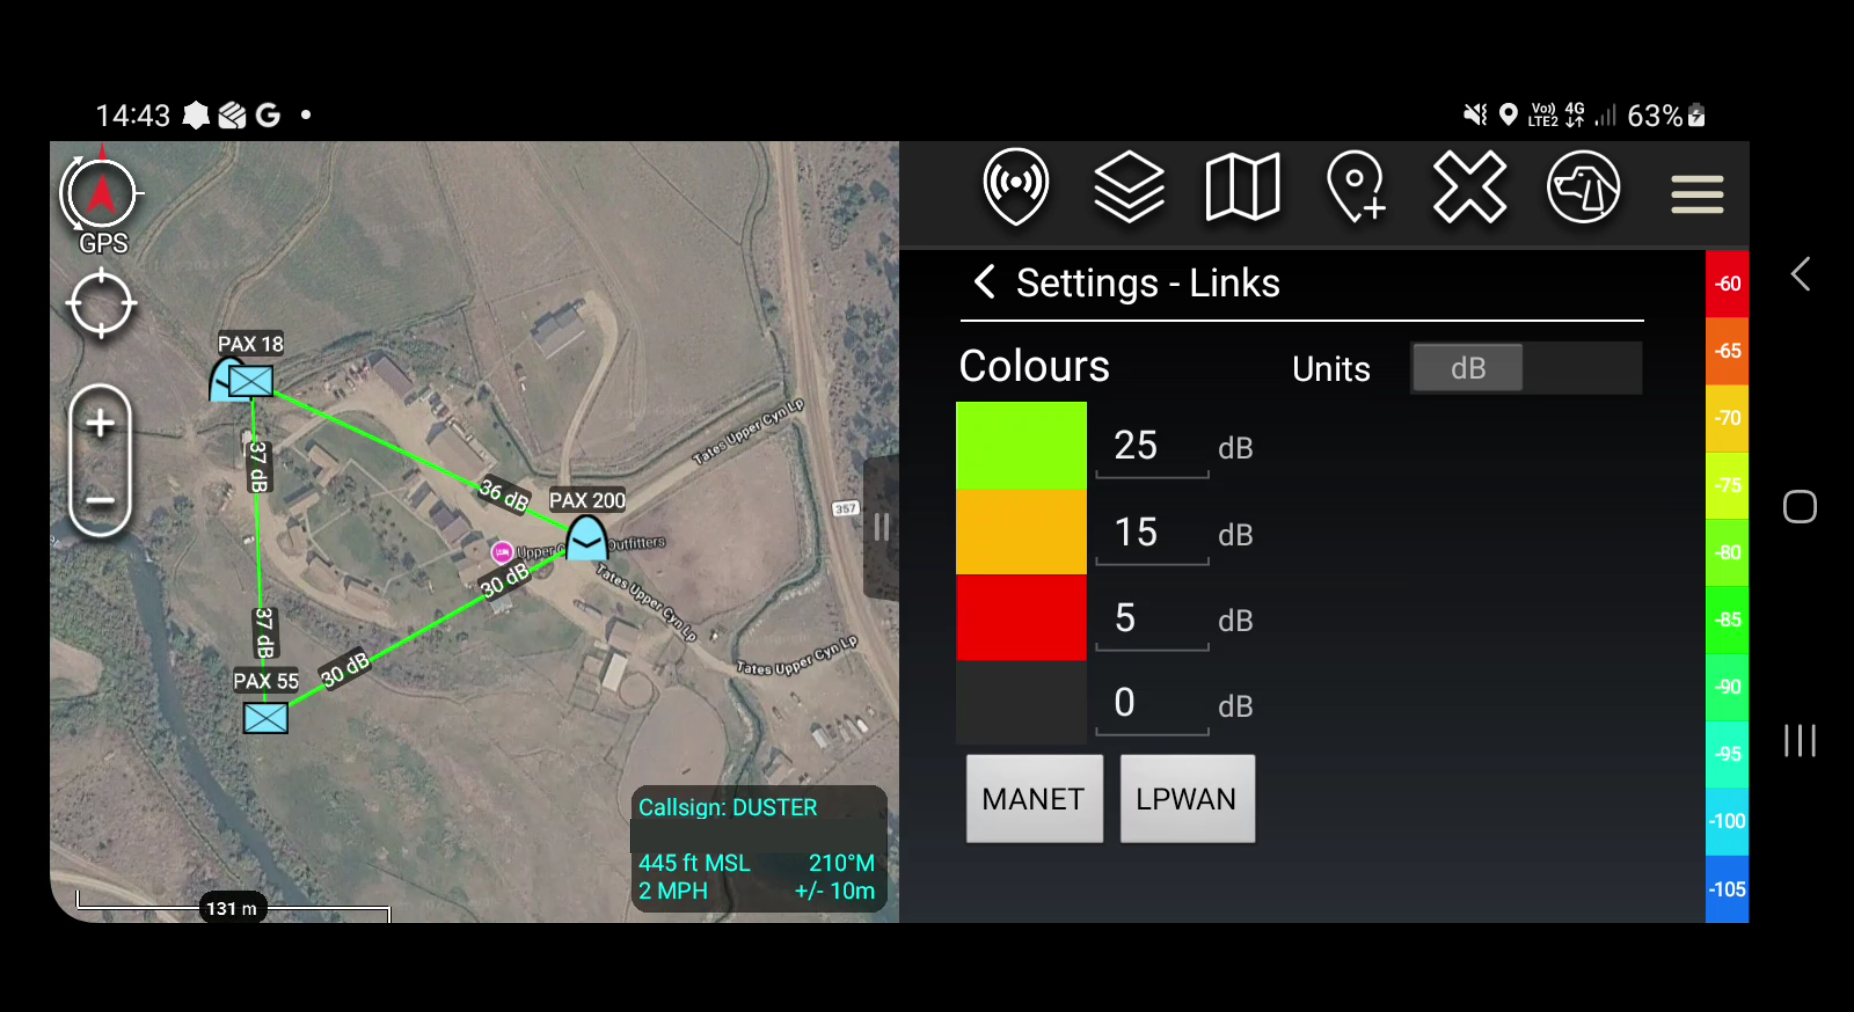
Links can be assigned colours and step sizes. Units can also be chosen from dB and dBm. Pre-configured options for MANET and LPWAN can also be chosen for convenience.
Co-Opt
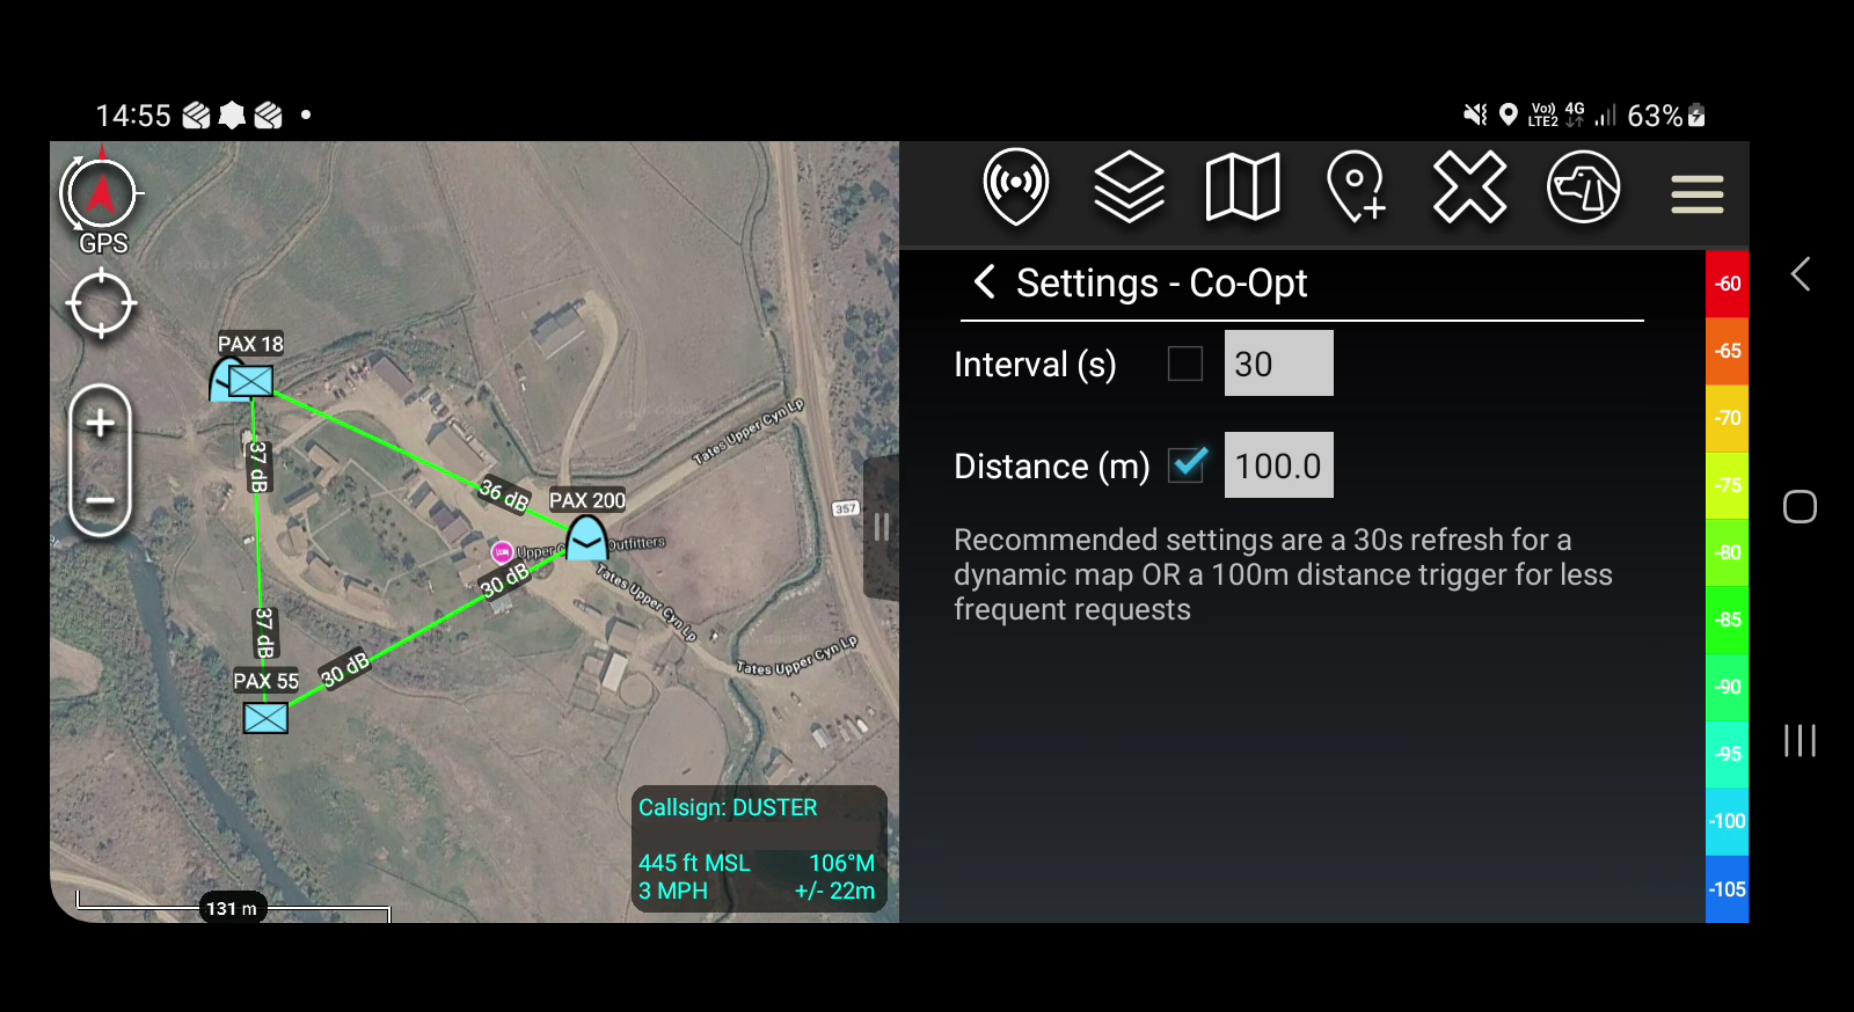
Within the Co-Opt settings, adjustments can be made to how and when the layers are re-calculated. This allows for rapid time-based updates for moving platforms like drones or for on-demand updates for networks with limited bandwidth.
Templates
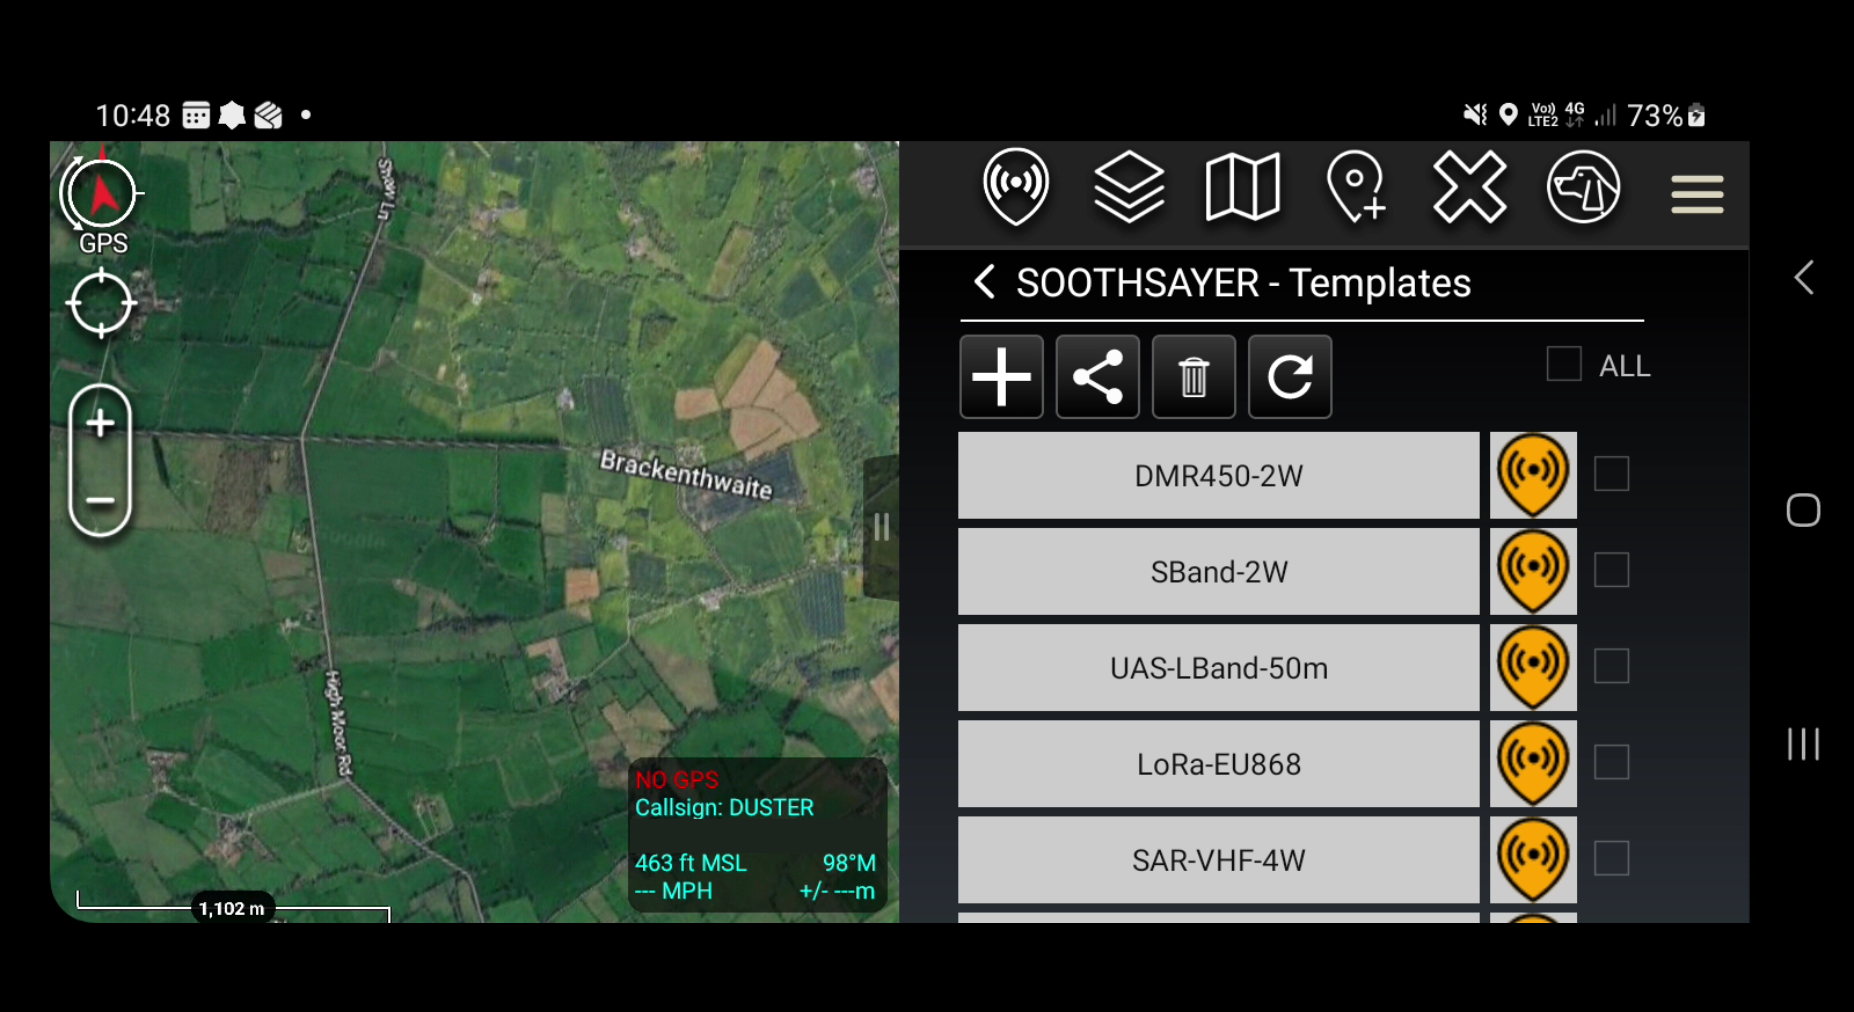
In this window, we can see all the Templates currently associated with the account as well as several management functions. There are checkboxes next to each template, these can be used to select templates for various actions.
Importing Templates
The “+” icon is used to import Templates into the plugin.
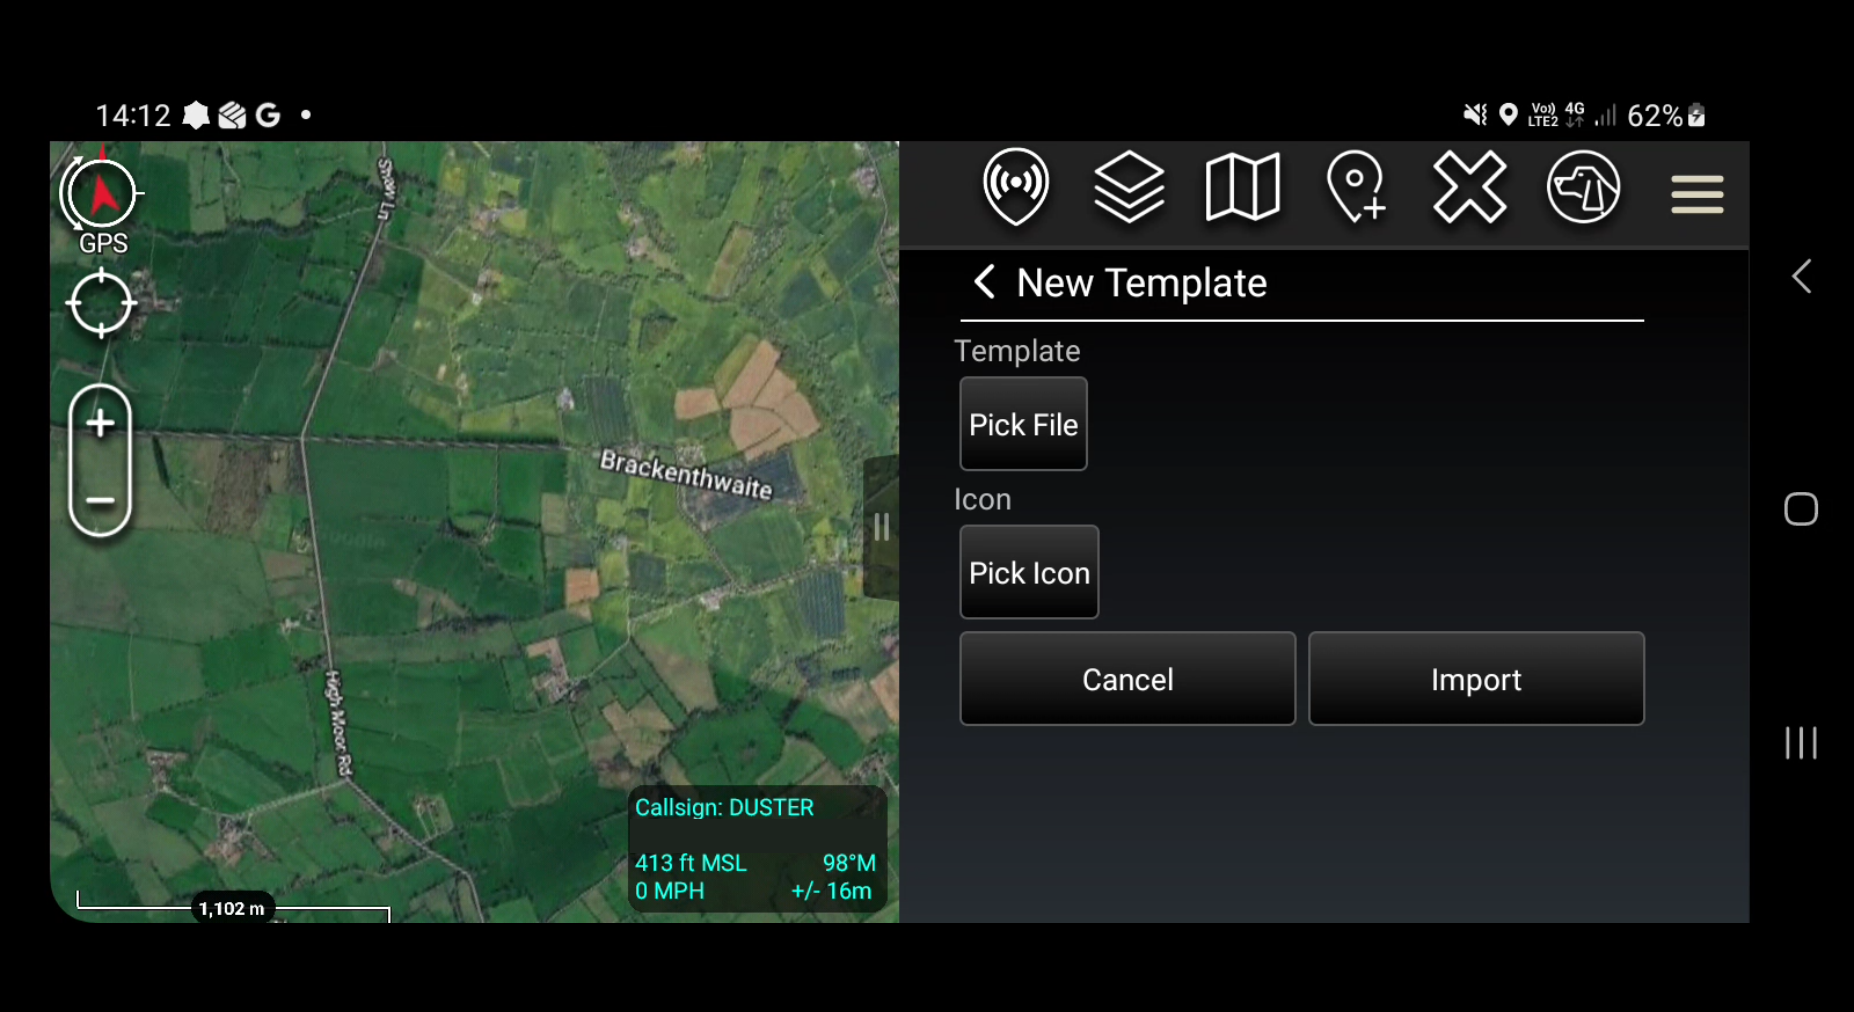
Pressing the “Pick File” button opens a file browser window where files can be selected.
The “Pick Icon” button allows an Icon to be chosen for the template.
When the template file and icon has been selected, press the “Import” button to add the Template to your account.
Sharing Templates
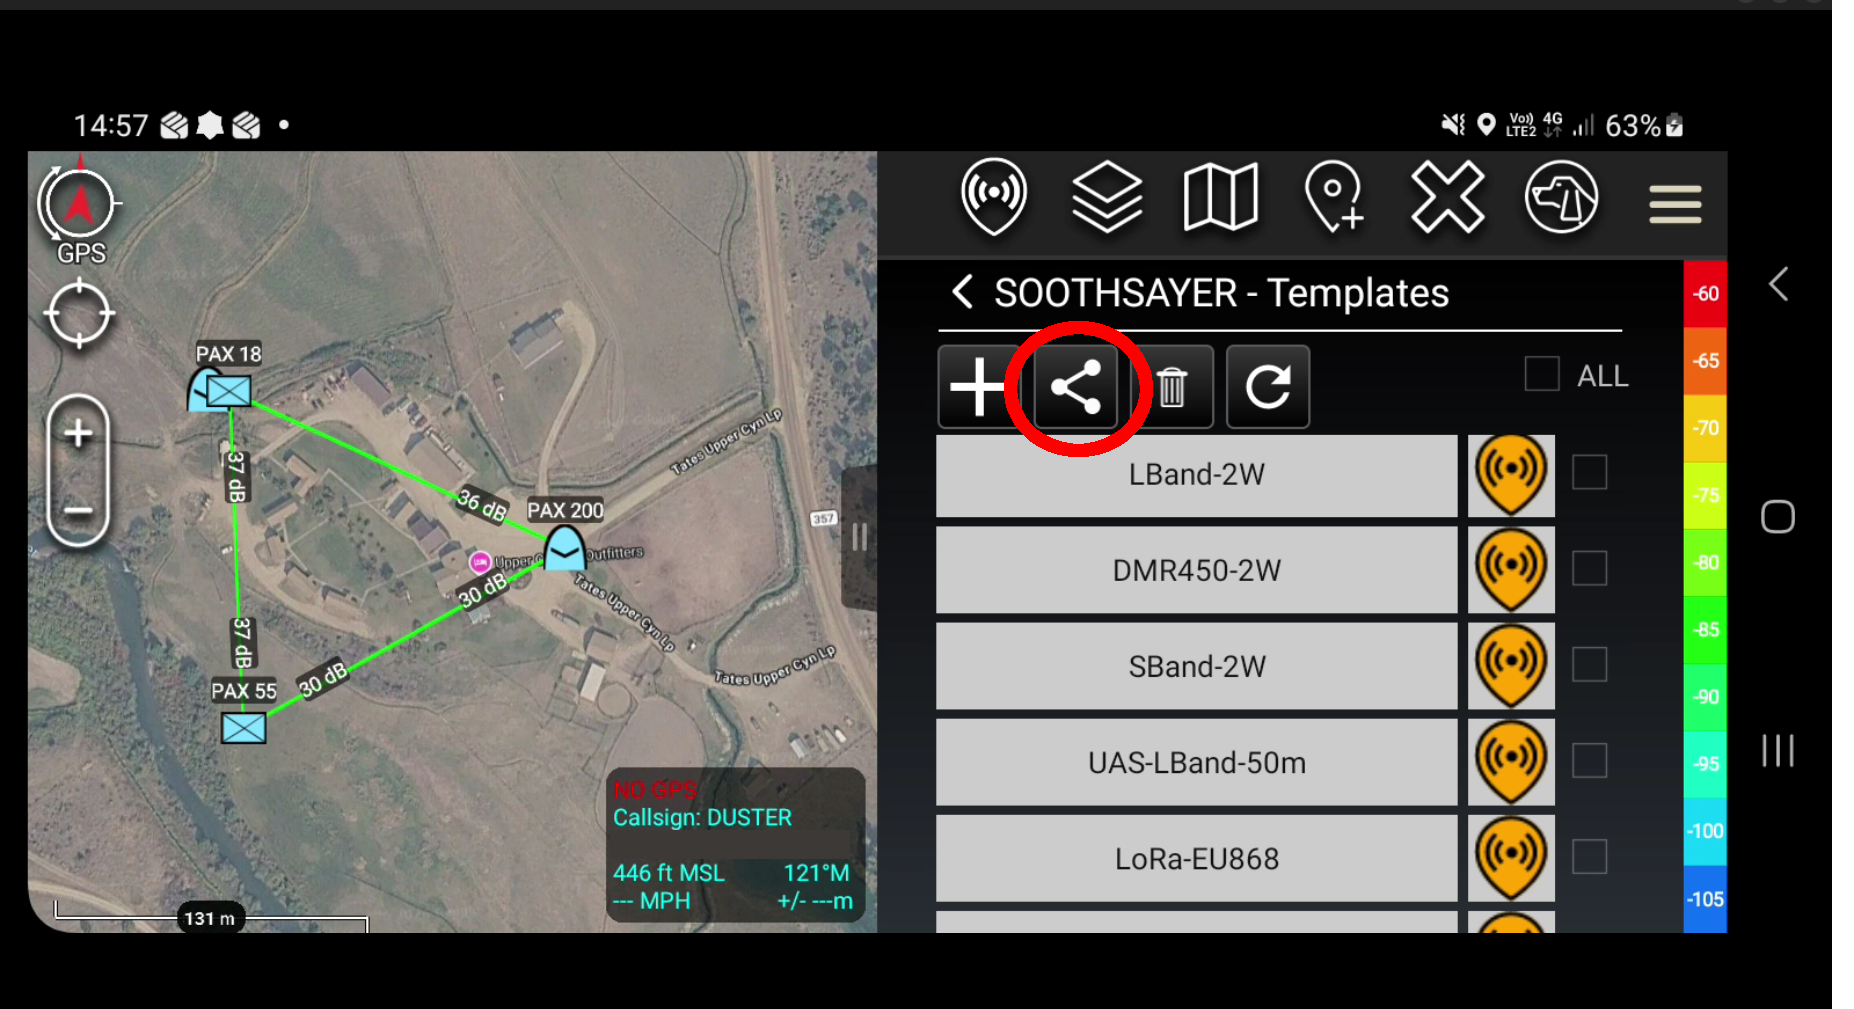
The share icon can be used to share checked templates with other users.
Deleting Templates
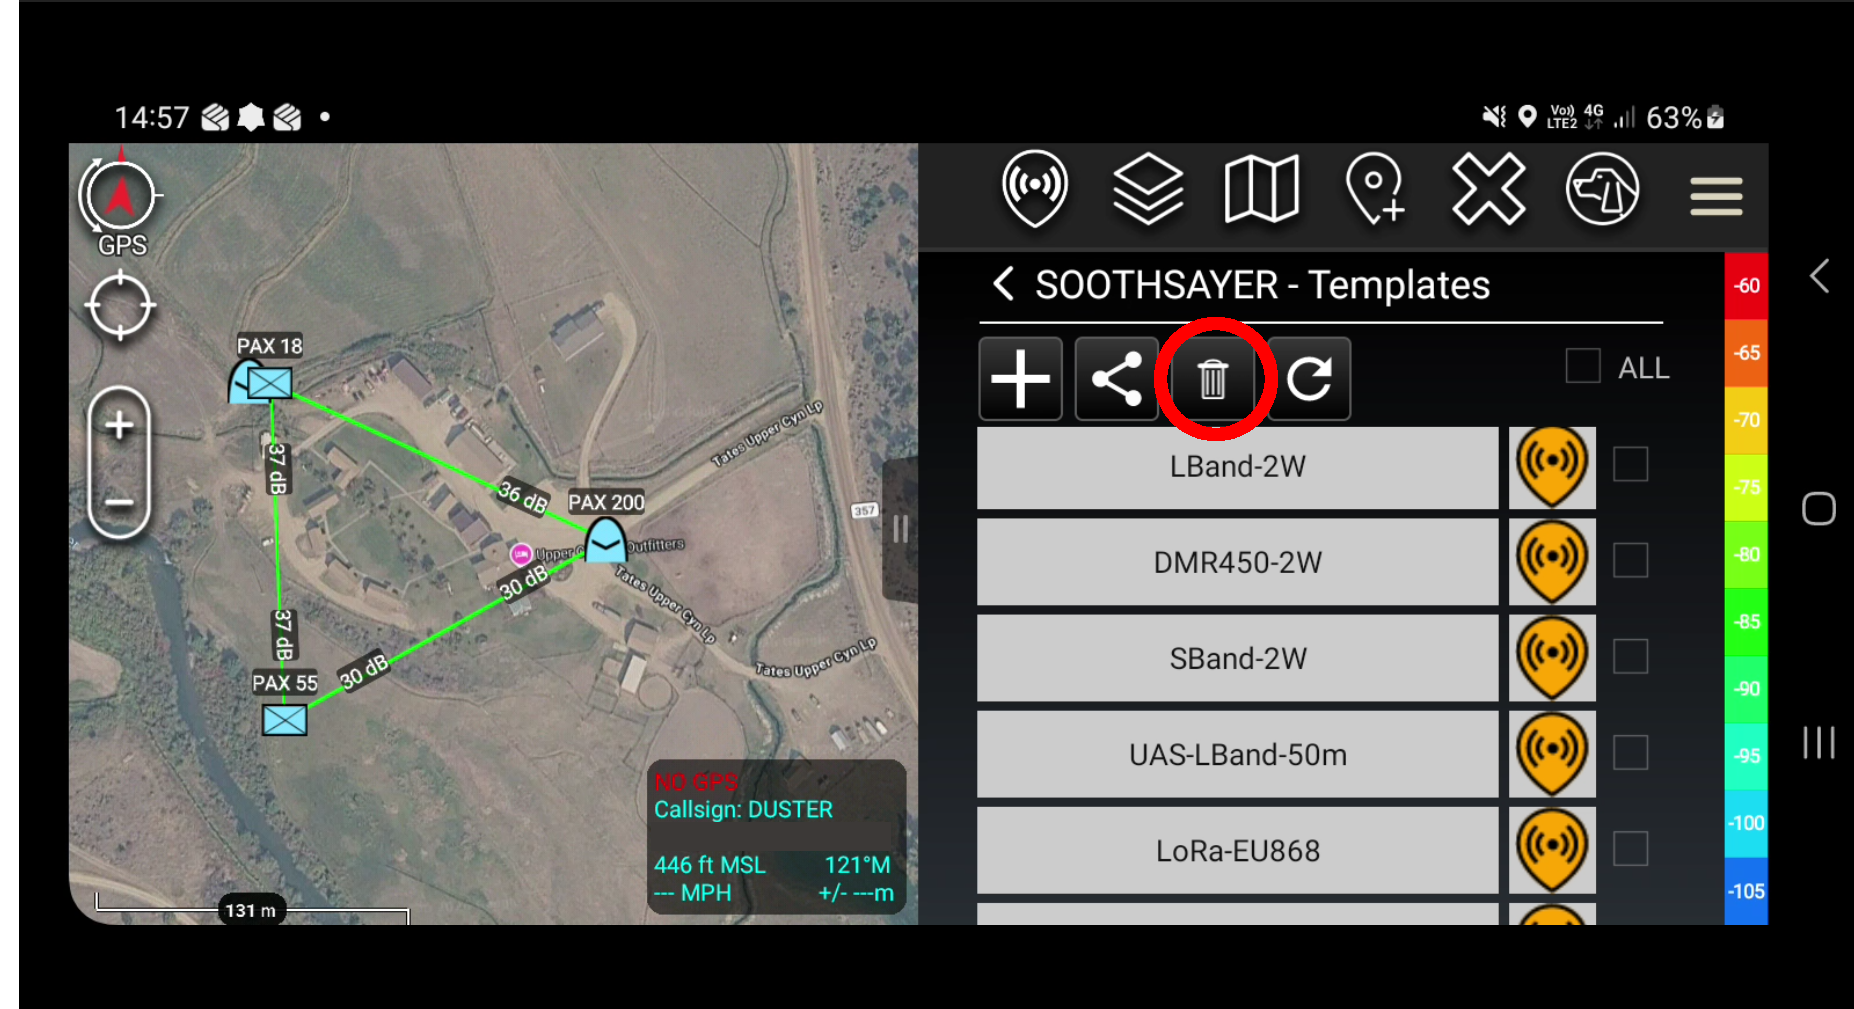
The delete icon can be used to delete checked templates. Be aware that if the template was fetched from an account login, it will return on the next login until it is deleted upstream on the server.
Polygon tool
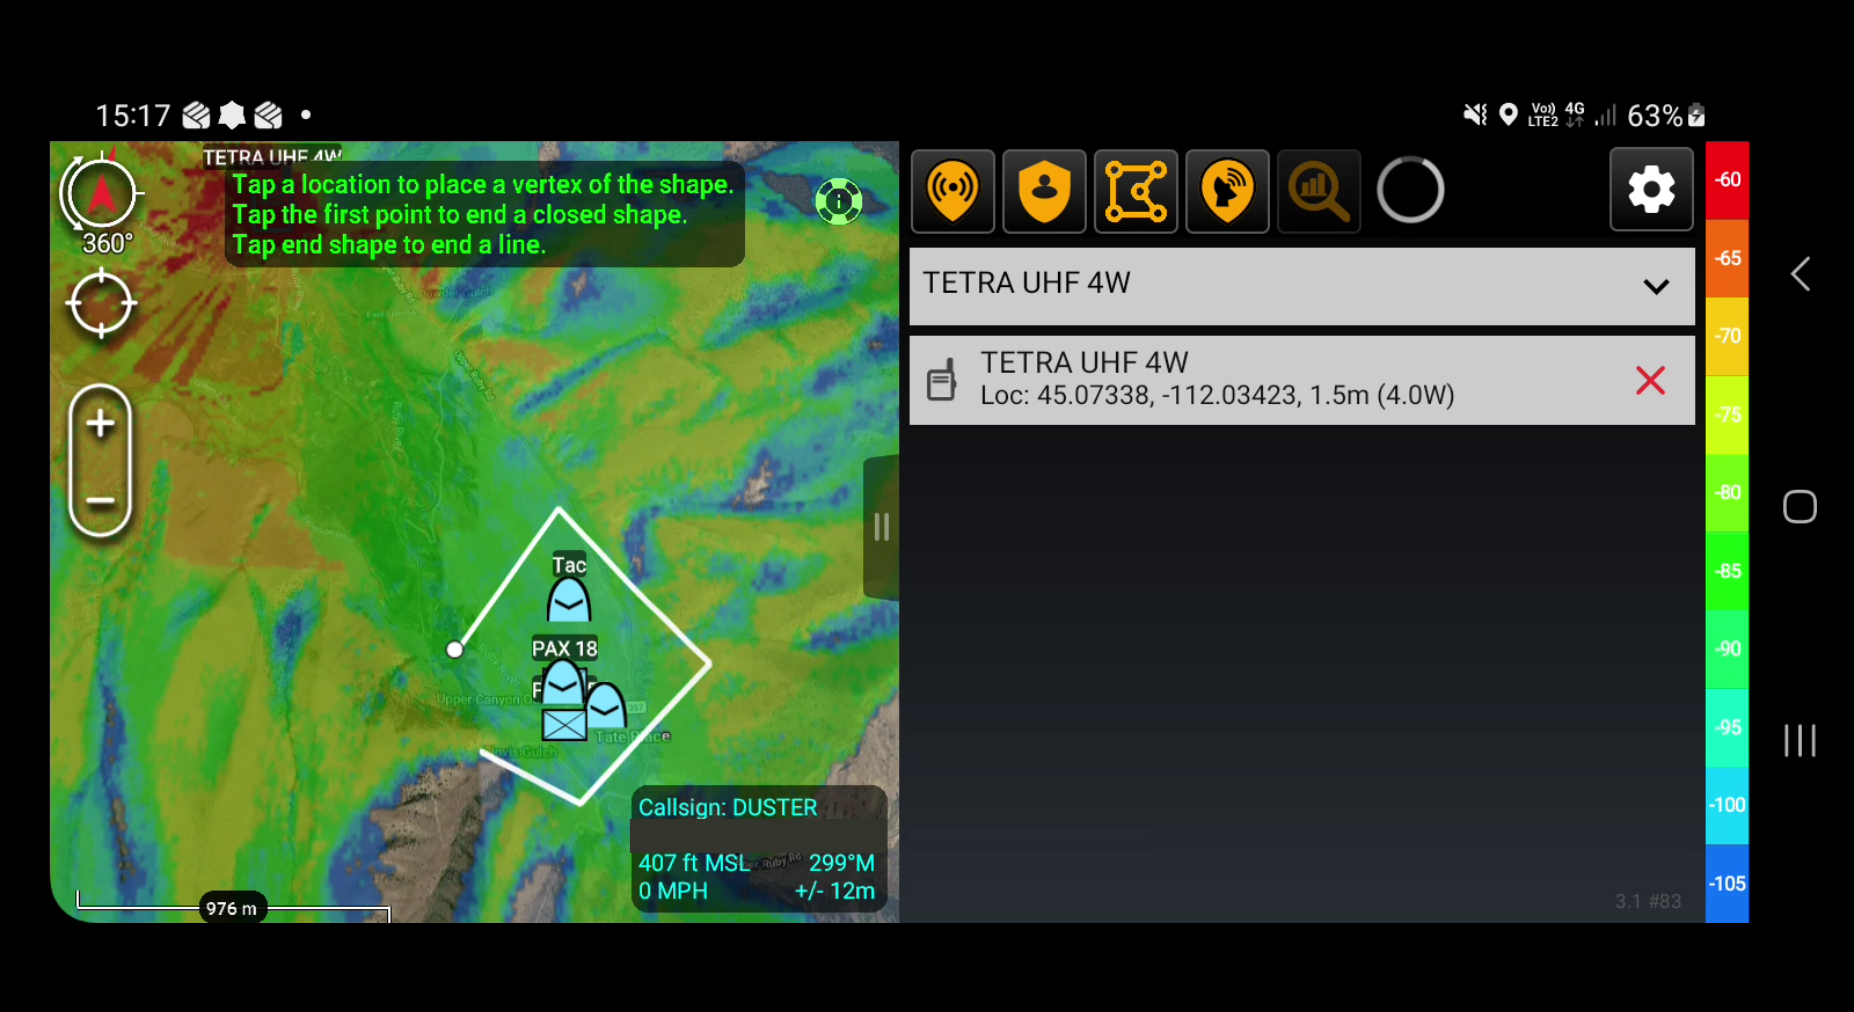
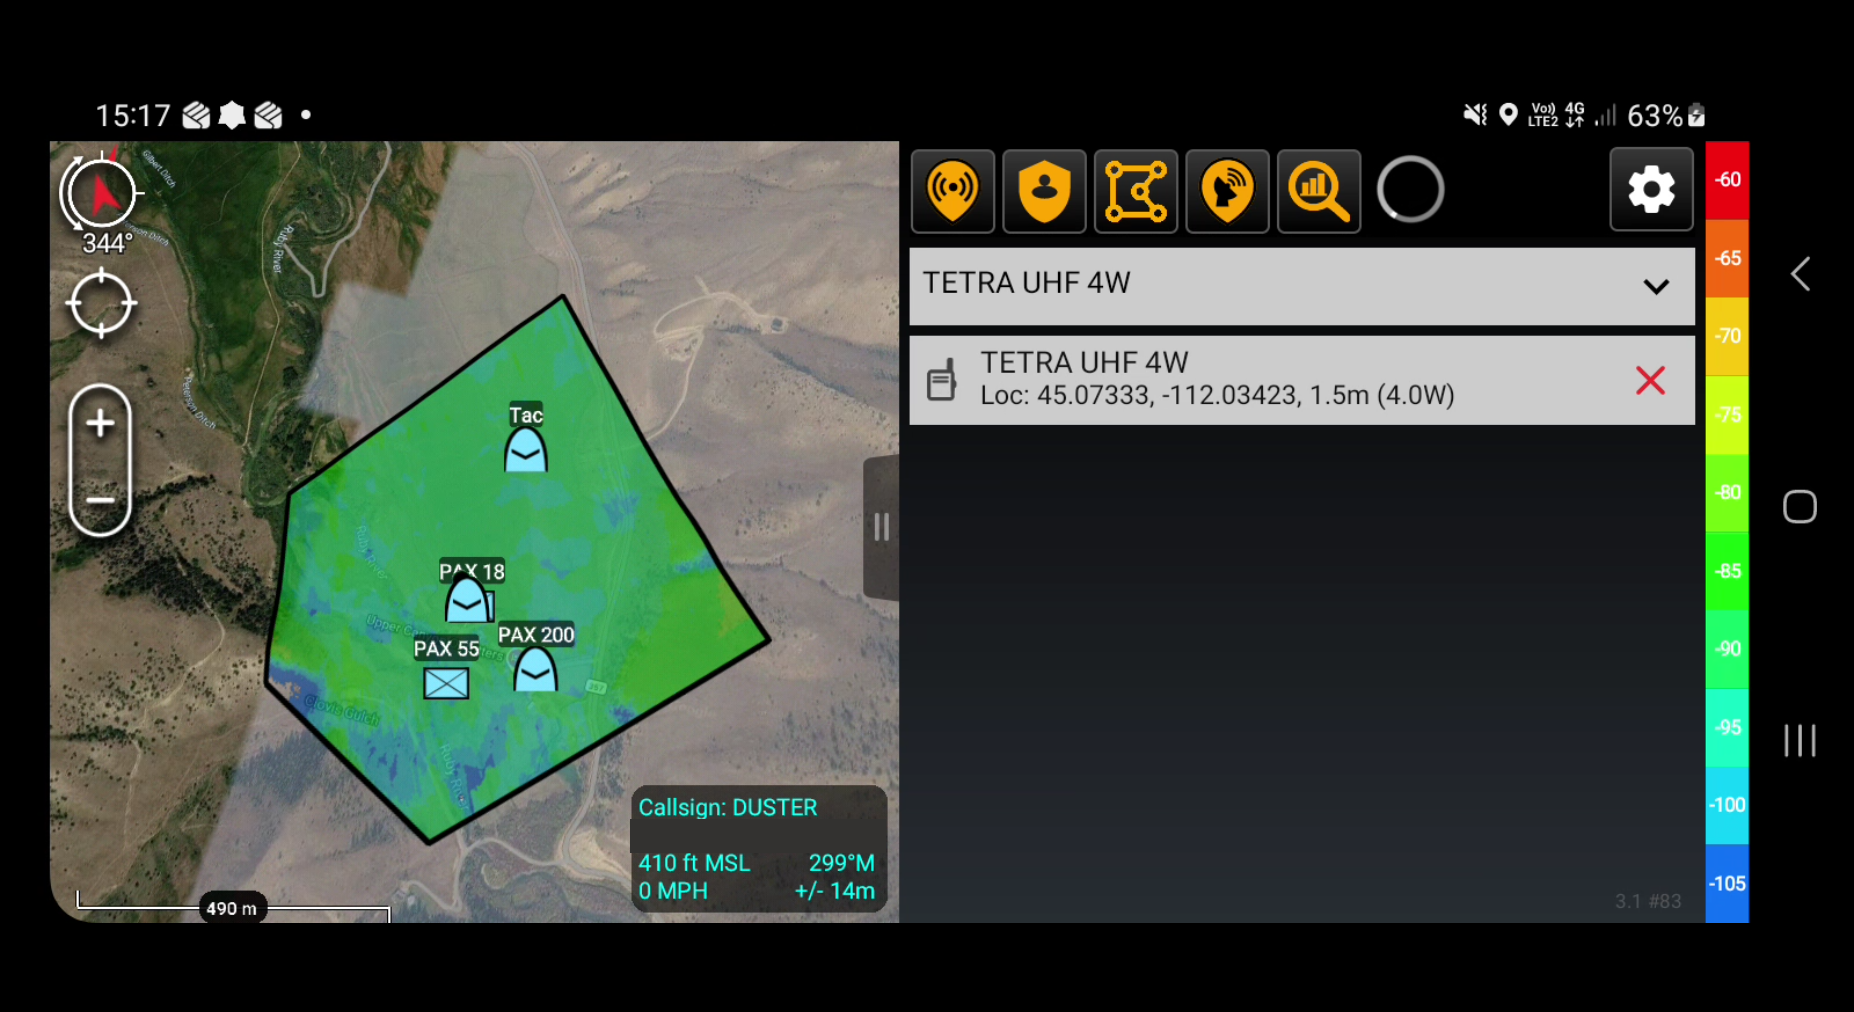
The polygon tool allows focused studies of distant areas using the “bounds” parameter in the API, supported by tools like Best Site Analysis (BSA) and Satellite spotbeam. This allows faster, smaller, higher resolution calculations which reduce bandwidth and memory consumption in the viewer whilst keeping the wider map clear.
To use it, click the polygon button and draw a shape upon the map. This shape will be referenced for all future calculations.
Best Site Analysis
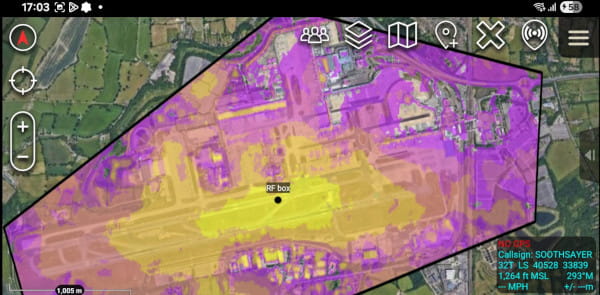
The BSA tool performs a Monte Carlo simulation of hundreds of random sites within a polygon. These sites are graded and represented as a plasma coloured heatmap.
To use it, draw a polygon first around the area of interest. Ensure you focus on the candidate sites and do not cast your net any wider than you need.
The best site (top 10%) is bright yellow and the worst (bottom 10%) is not coloured. This helps decision support with choosing between the better of two sites, or hopefully avoiding a bad site.
Tip: You can model LEO and CUAS with this by setting a receiver height to 1000m and a radius of the same from your objective area. The sites with the very best view of the sky will be graded higher than others…
Co-Opt tool
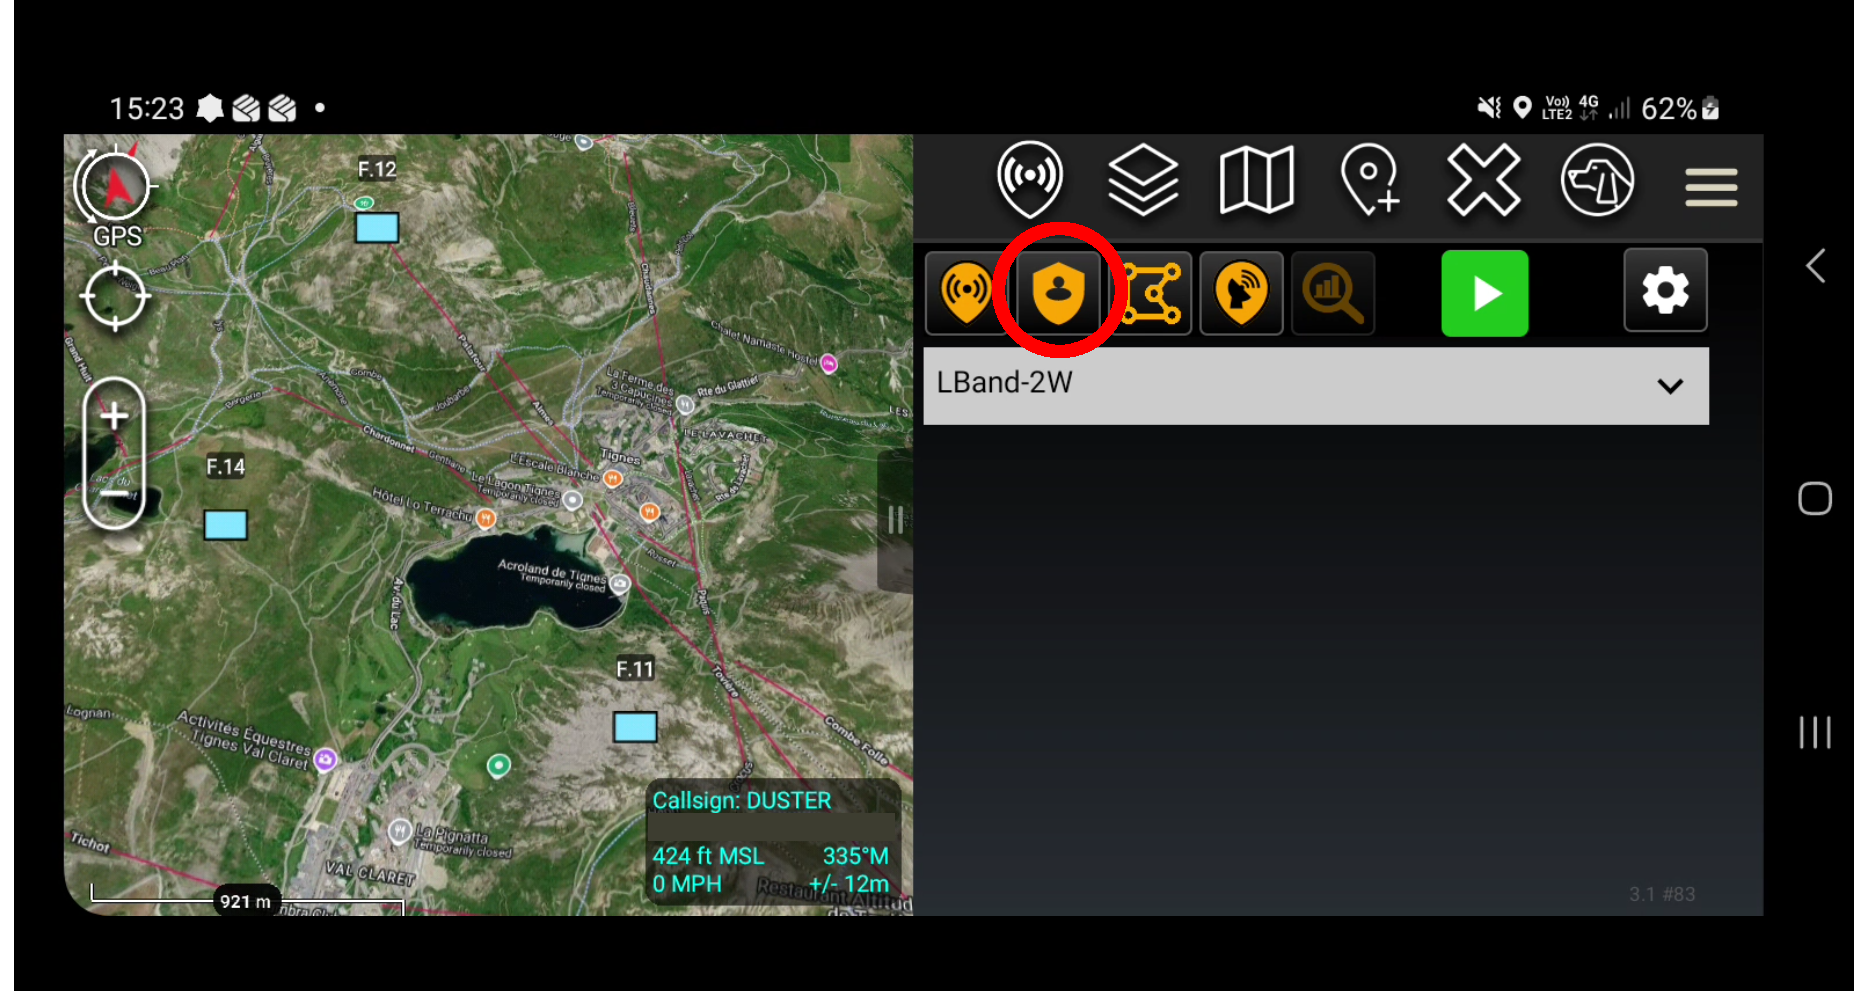
The Co-opt tool allows operators to adopt any marker/vehicle/person/radio upon the map and model live radio coverage for it. For a moving track like a vehicle this is a powerful standards based upgrade which provides live RF mapping without requiring commercial agreements or integrations between vendors.
When the tool is selected, available map markers will be listed. These can be assigned a user defined radio template eg. “LBand-2W”. Templates can be defined within other interfaces or shared as .json files.
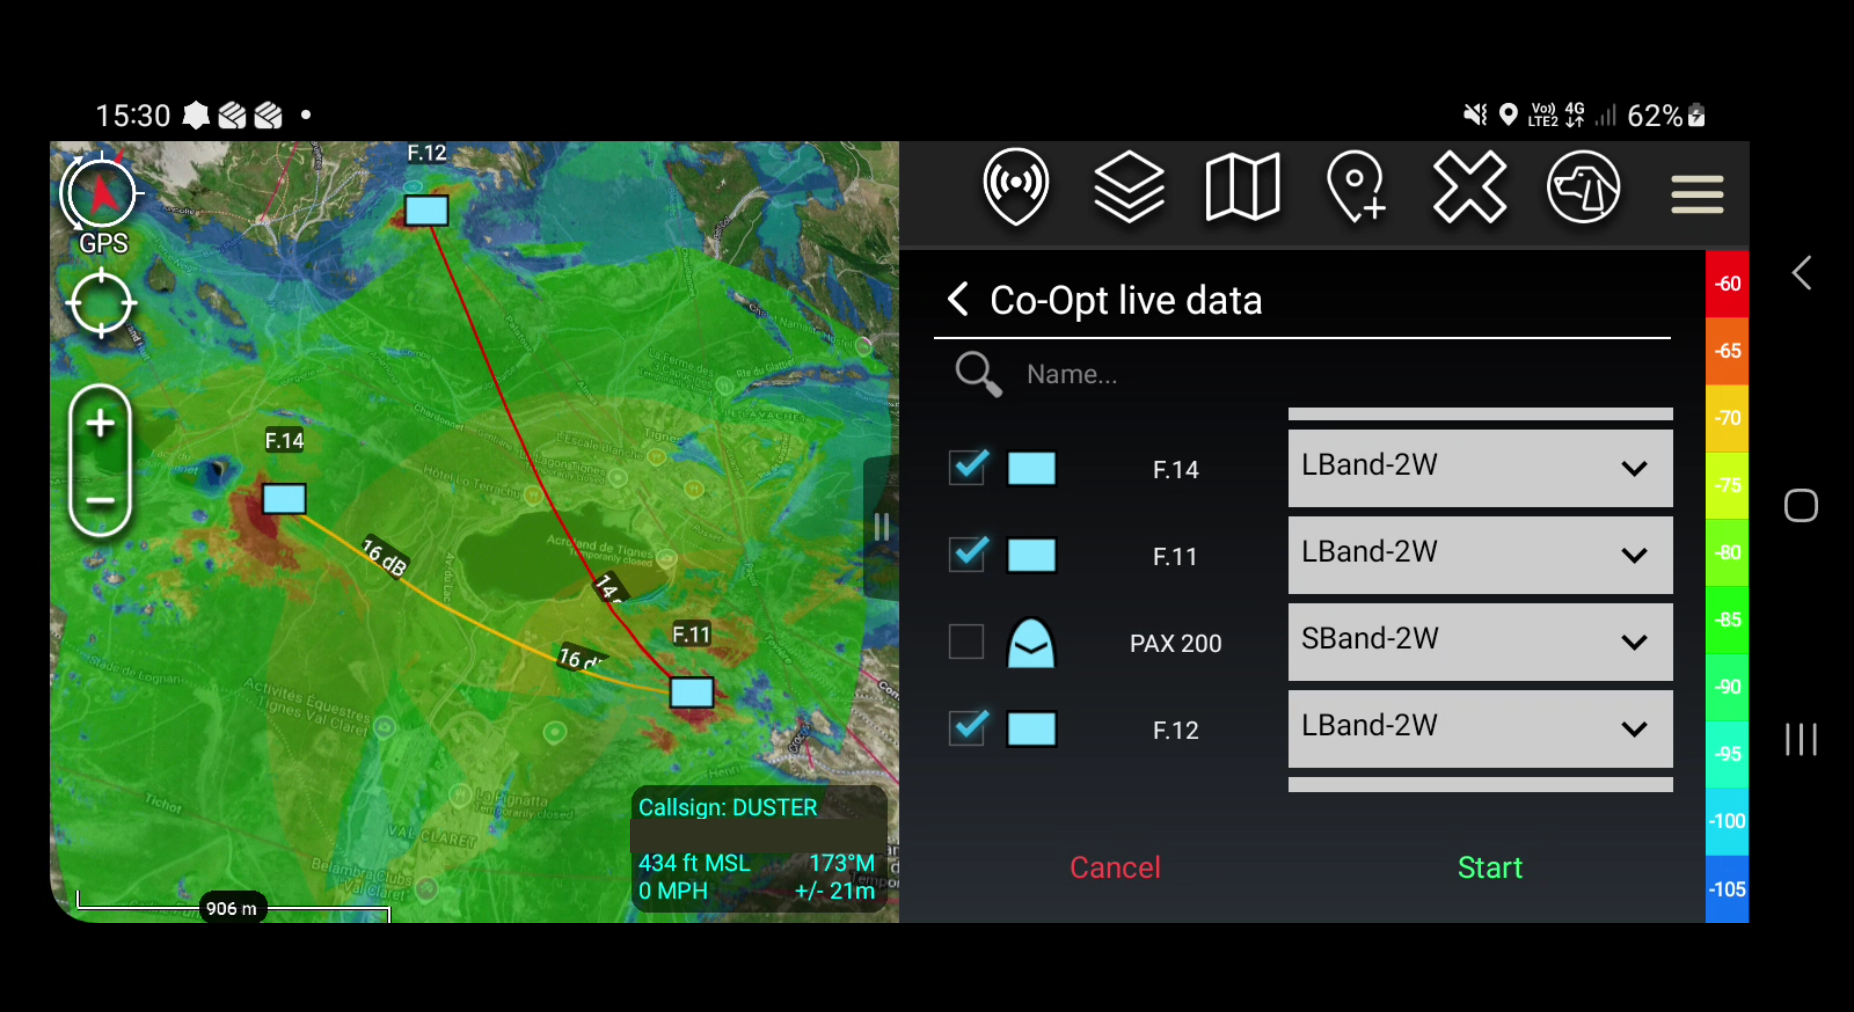
Once you press Start, the coverage will be modelled according to user defined rules in Settings-Co-Opt.
The bandwidth use of this feature varies depending on both your refresh rate and image resolution, defined within the layers options and selected layers. If you have low bandwidth, you can disable the heatmap coverage layer and if you have bandwidth or your server is local you can increase the megapixels of your coverage layer from the layer options.
Nodes can still be simualted without there being COT active, alllowing planning to take place with a live enviroment.
Satellite coverage
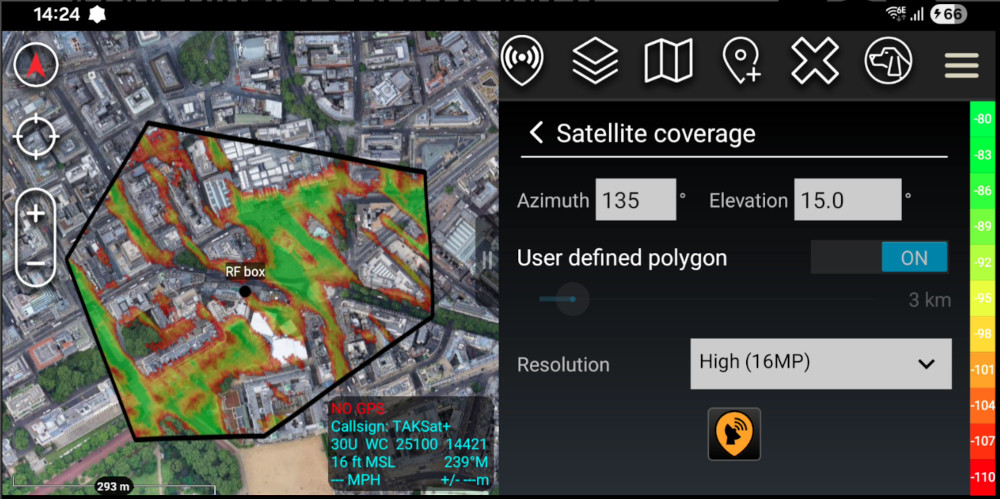
The Satellite coverage tool calculates the served coverage area for a distant satellite on a given azimuth and elevation, as seen from the ground terminal. It uses an L Band signal with diffraction for maximum accuracy.
It is the latest iteration in our Satellite toolbox, powered by out new Spotbeam API and offers several unique advantages over legacy tools:
High accuracy with global buildings and trees
Diffraction and attenuation capable for vegetation
Works for planned satellite positions not present in TLE data
Models an entire area not just a point or a route
Original plugin built and supported by a company you can contact
Finding your angles
Satellite angles can be sourced from any number of apps or websites. Enter the name of the satellite you are looking for and a time if available to receive a best estimate. A recent site is dishpointer.com
Note for LEO constellations like Starlink, you can use nominal values such as Azimuth 180 and Elevation 30. This will still serve the purpose of ranking good versus bad sites even without precise angles due to its dynamic nature.
Wide area study
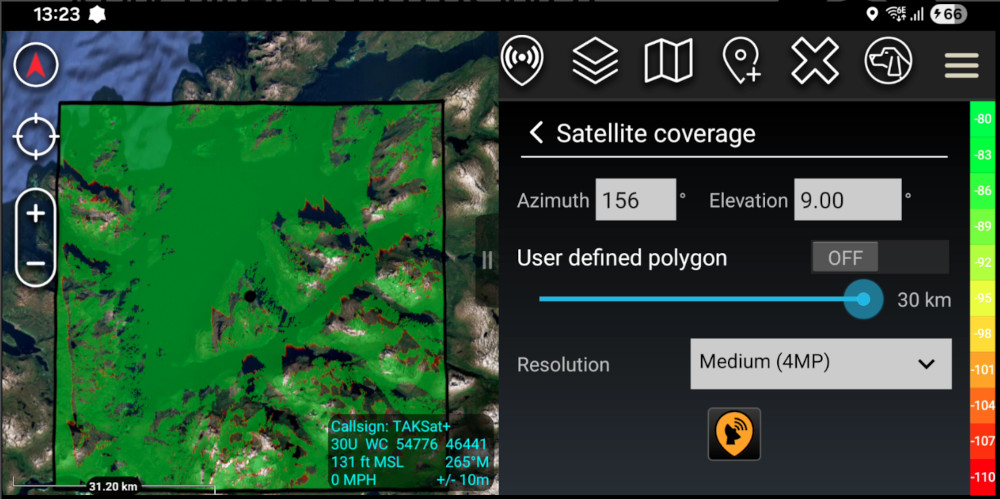
Zoom to the city or mountain range of interest, then set the azimuth and elevation, set the resolution to Medium (4MP) and click the satellite button.
The study will be performed for the visible map area as a rectangle.
High resolution study
Use the Polygon tool before opening the satellite tool to define a bounding box for an area. For best results this should be no more than a mile wide.
Open the satellite tool and the “User defined polygon” option should be enabled.
Set the resolution to High (16MP) and then click the Satellite button.
This will perform a high resolution calculation which will take longer but will display buildings and vegetation.
Editing a transmitter
Transmitter settings can be edited once they’re on the map.
Select the transmitter to open the menu then click the pencil to edit the settings. An edit form will open which supports Location, Height, Antenna Gain, Antenna Azimuth, Frequency, Power, Bandwidth, Reciever Height, Radius, Noise, Measured Units (i.e. Recieved Power/SNR) and Colour Scheme. Press “Save” to apply any change(s). Template files are unaffected and multiple antenna azimuths are supported separated by commas.
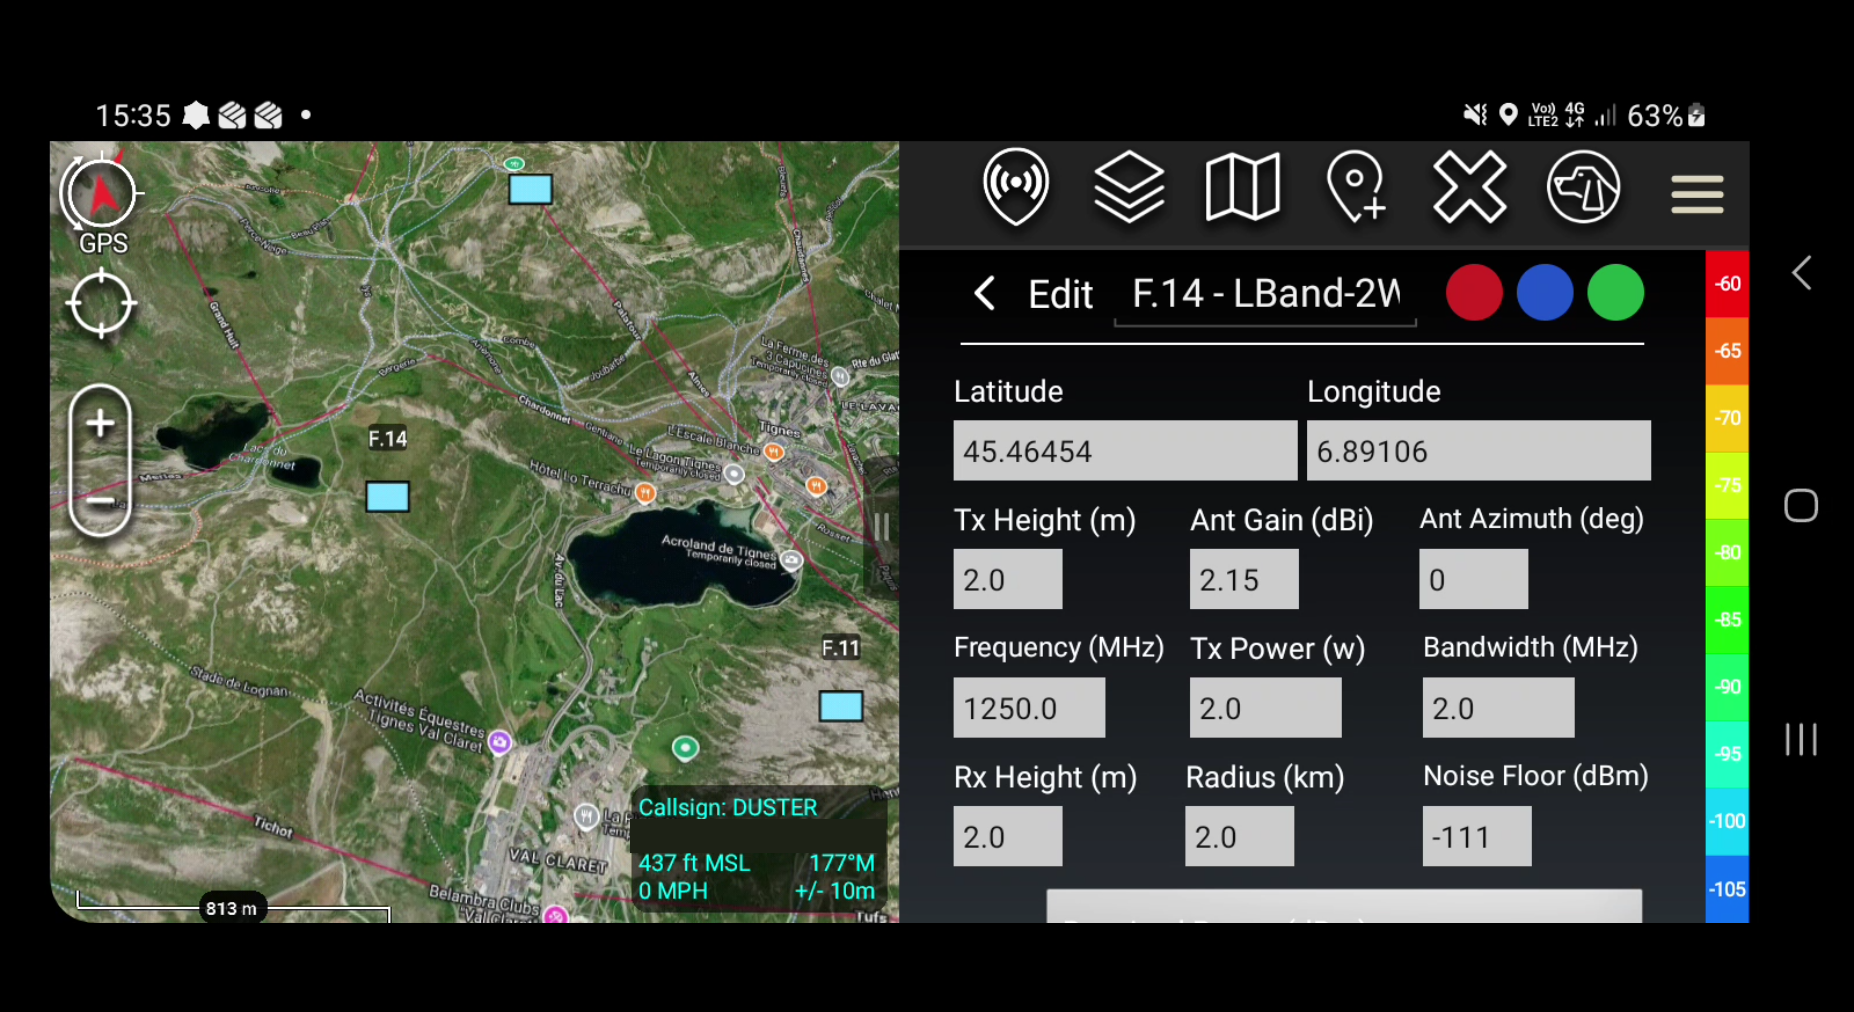
Other template settings can be edited in the .json template file on the SD card using a text editor. For a complete reference refer to the API documentation.
KMZ export
Coverage can be exported as a KMZ archive in several ways:
KMZ Share button
The latest KMZ generated by your account can be exported as a KMZ directly from Settings - Layers.
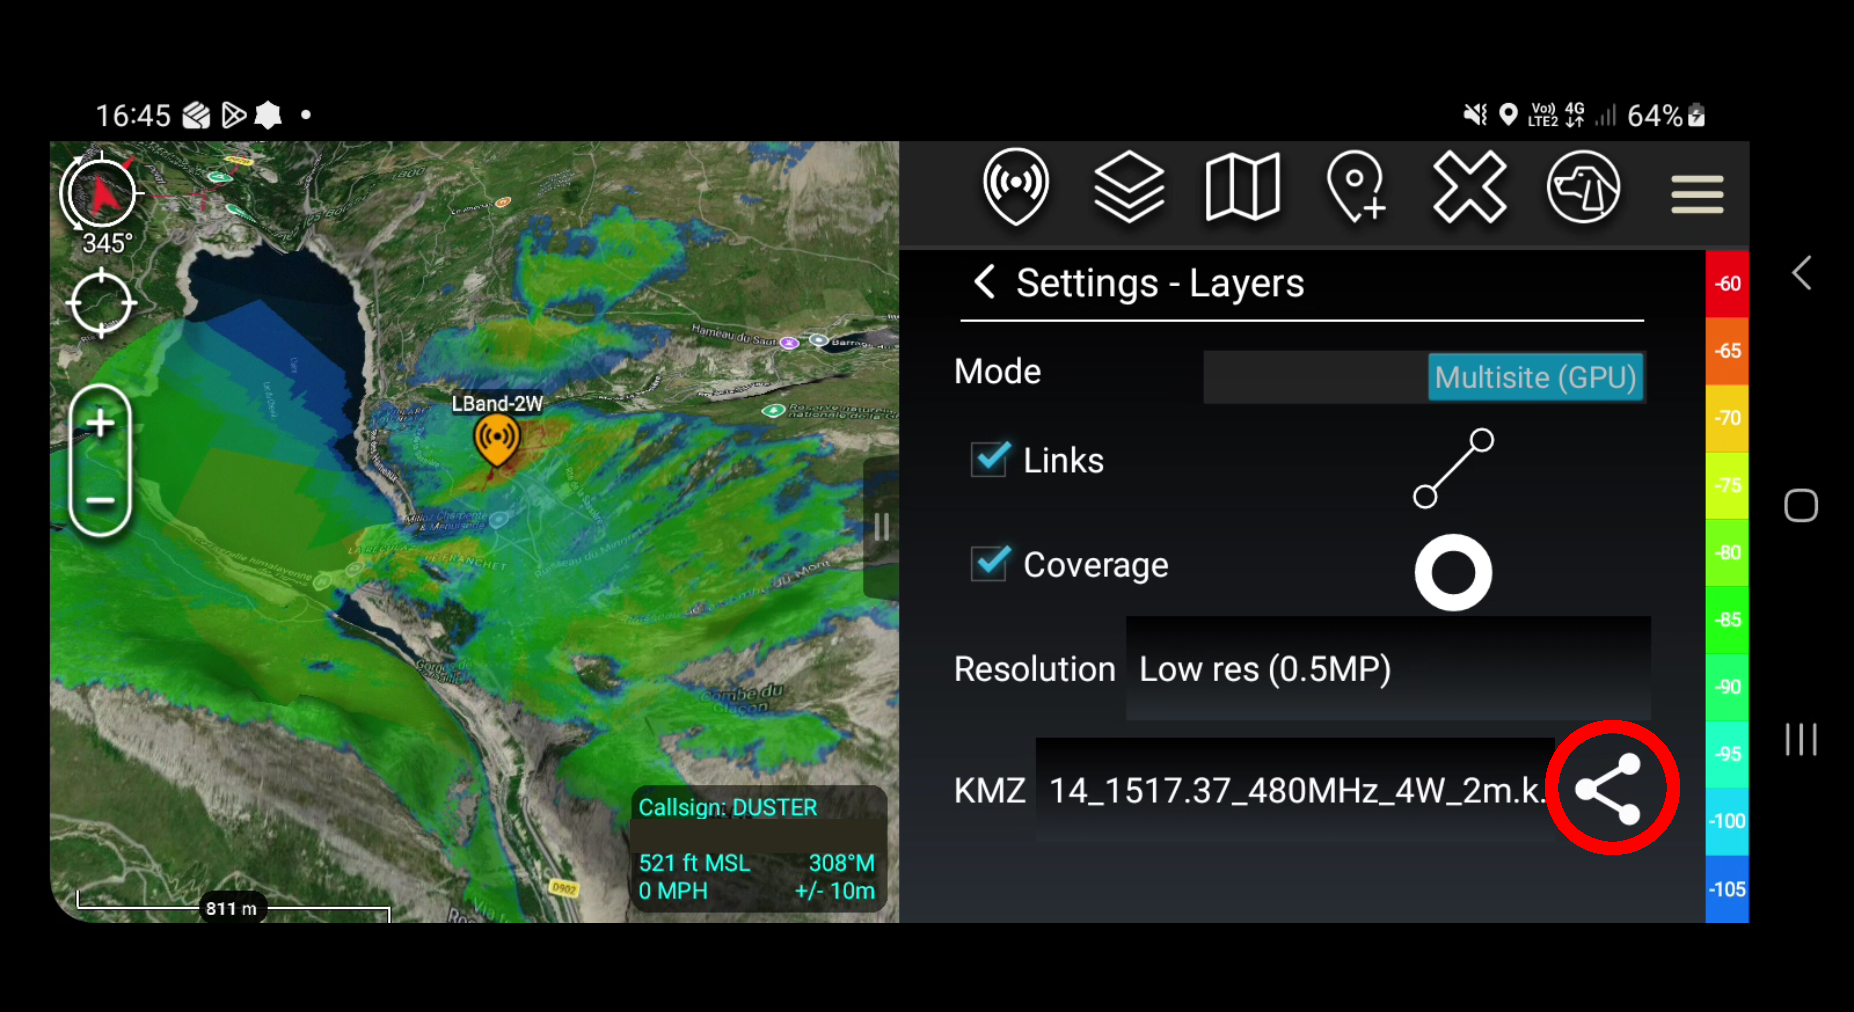
Pressing the share button opens an Android dialog offering several ways of sharing the KMZ i.e. Email, ATAK, Bluetooth.
Local Storage
Layers generated with the plugin are saved as a KMZ file in local storage (SD card or internal storage, depending on where ATAK is installed). The default filepath on the SD card is atak/SOOTHSAYER/KMZ/.
You can load them into ATAK as standard KMZ overlays using the Import tool or export them to another viewer such as WinTAK or TAKX. When prompted for a choice of the import method, choose “Image Overlay File”.
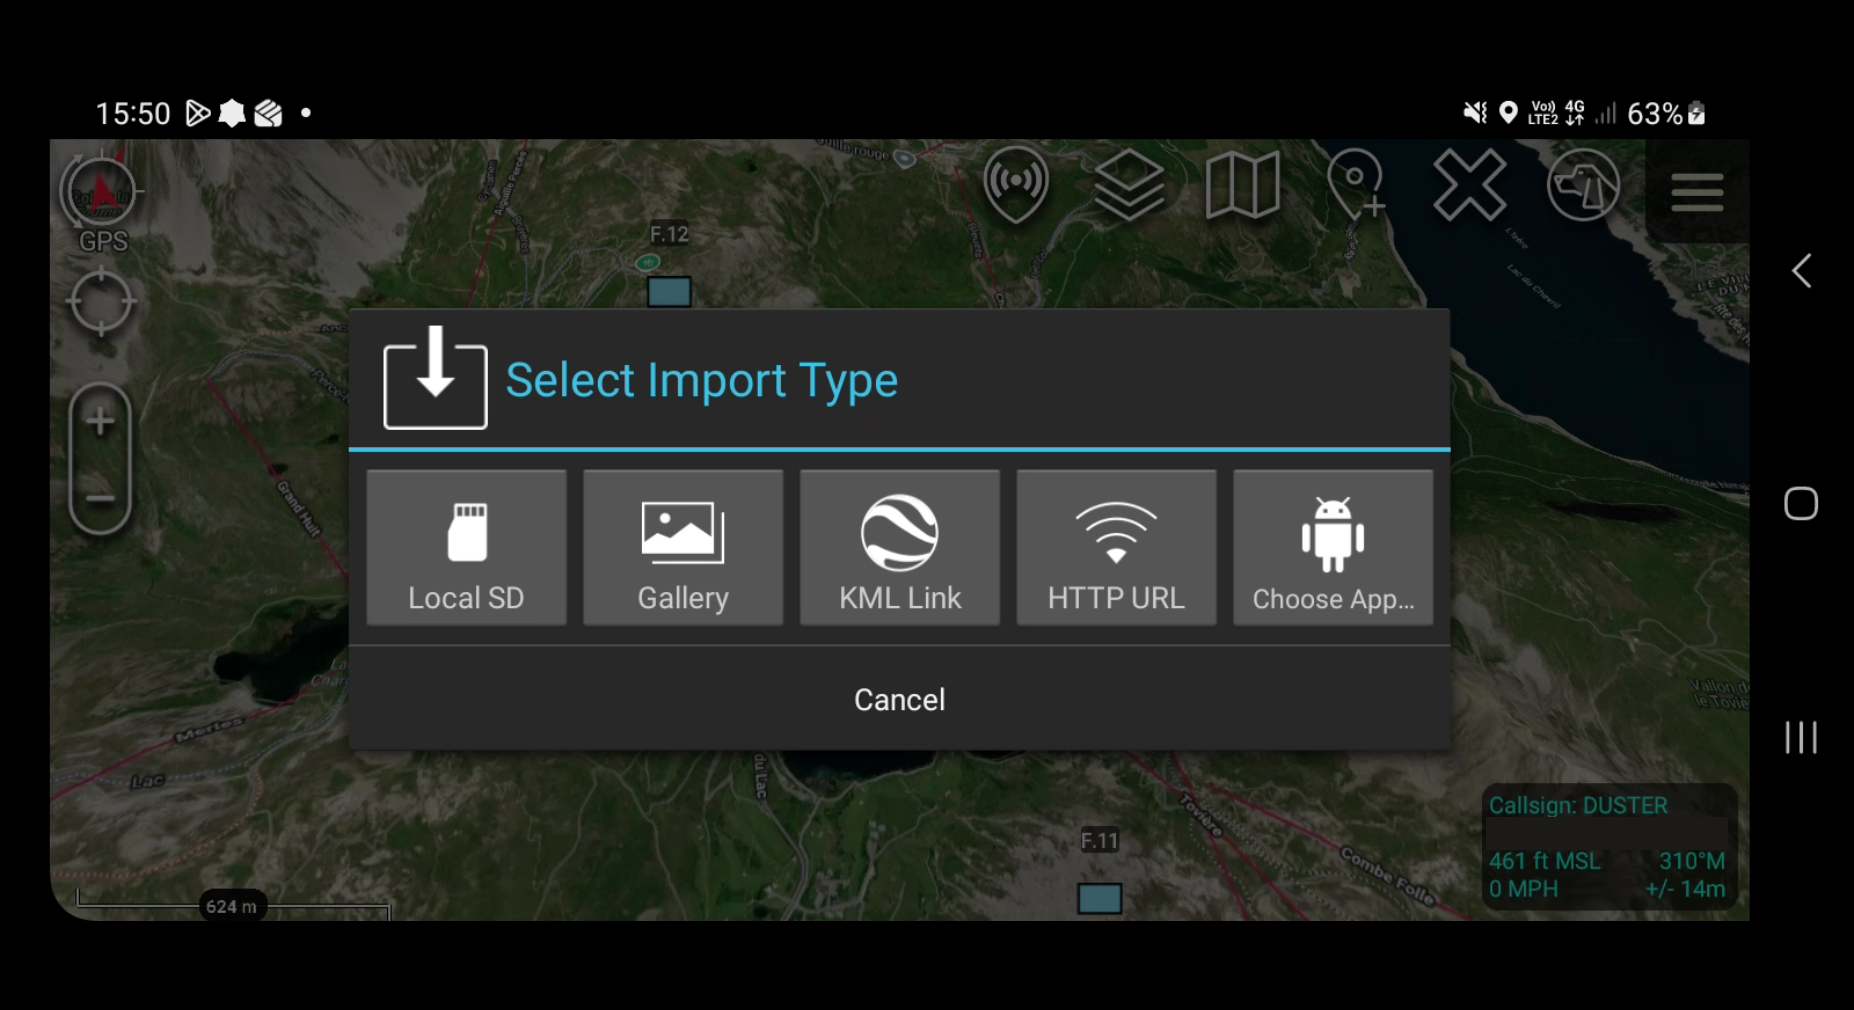
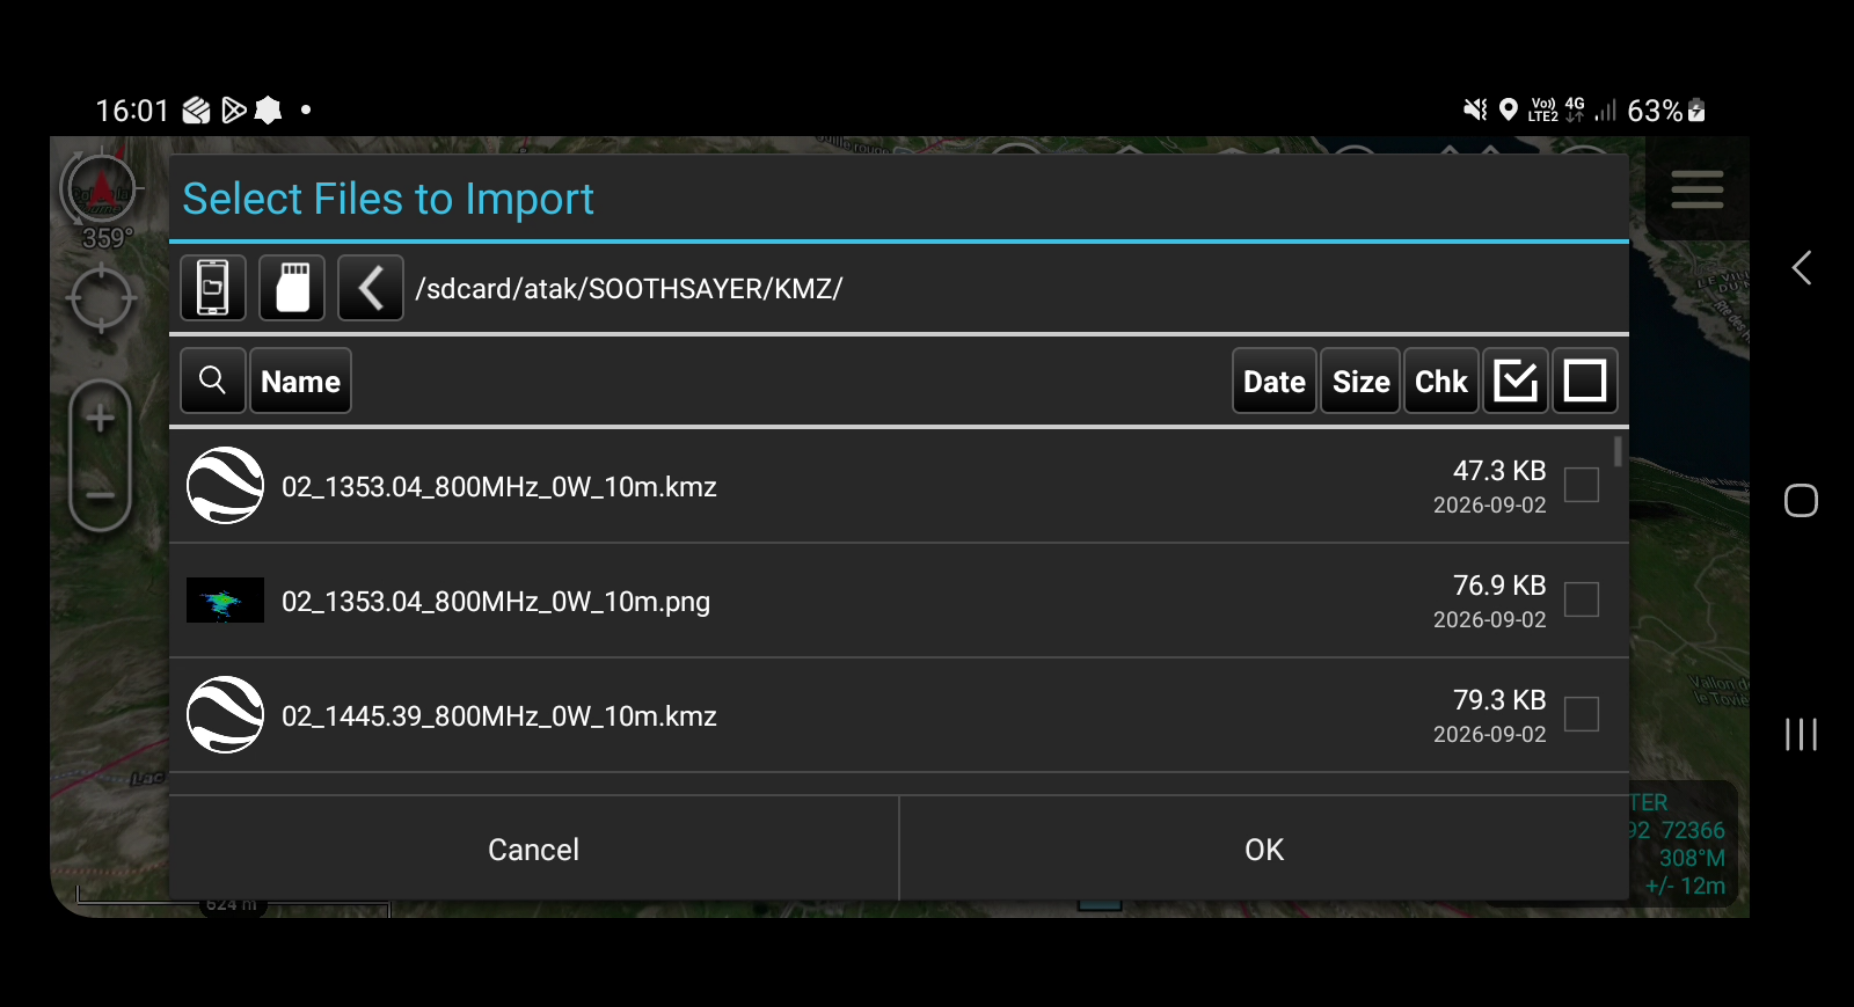
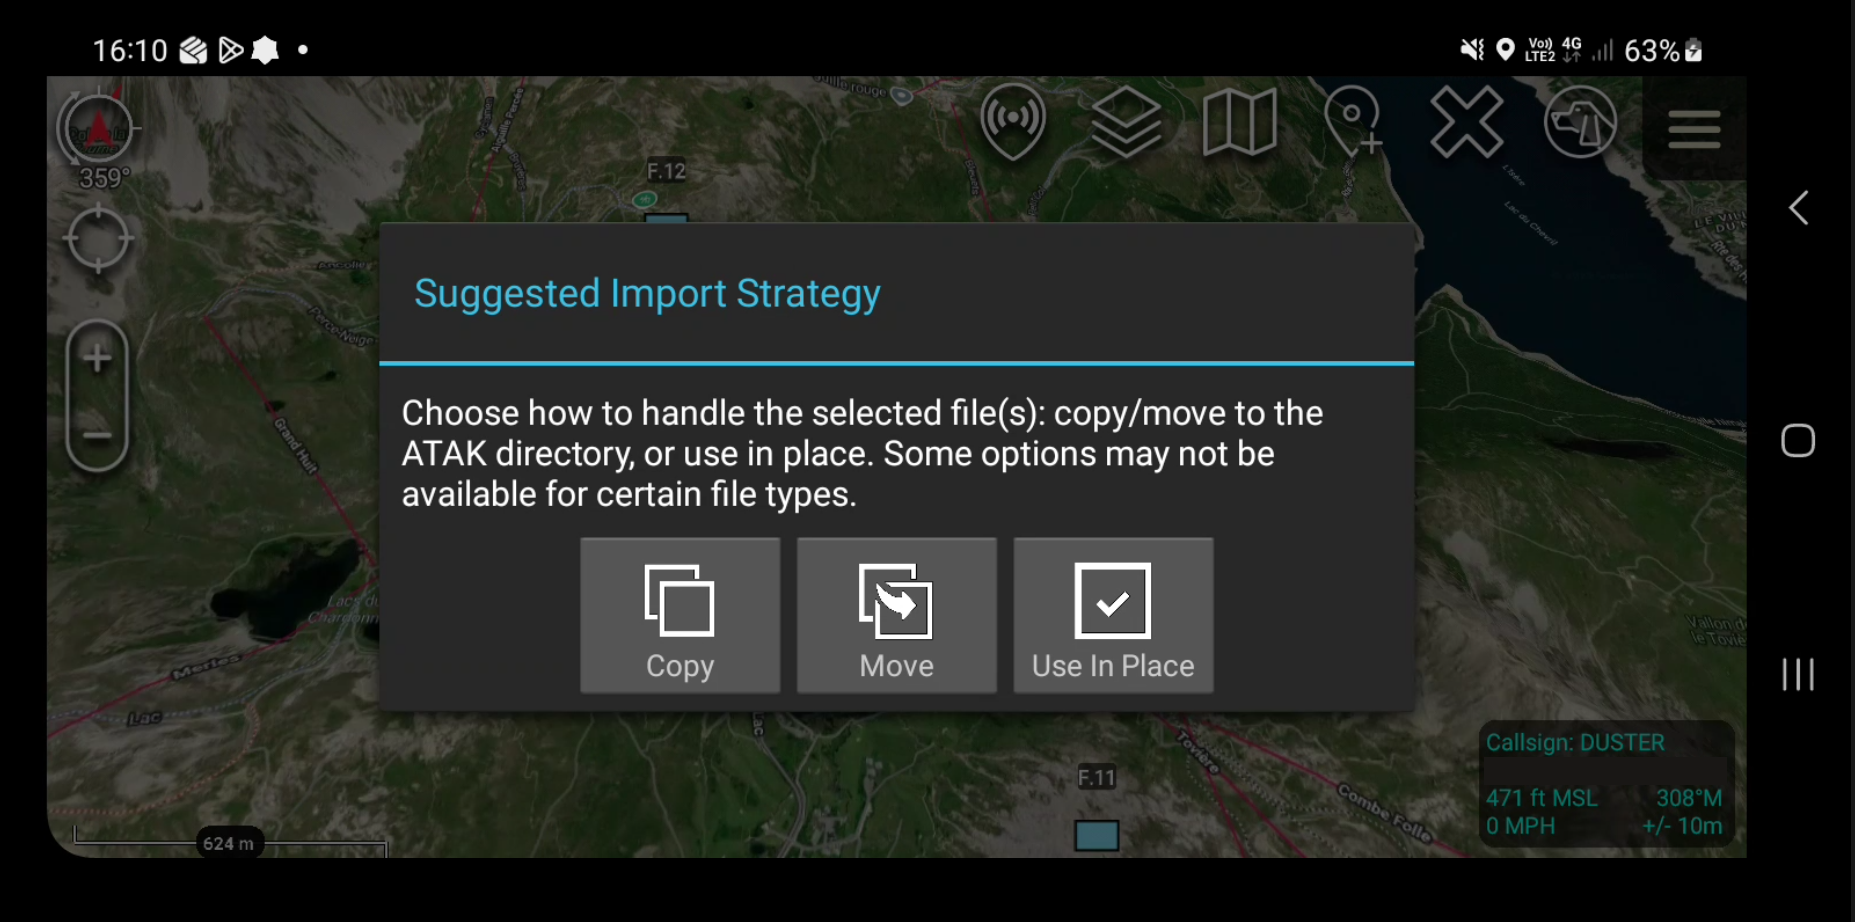
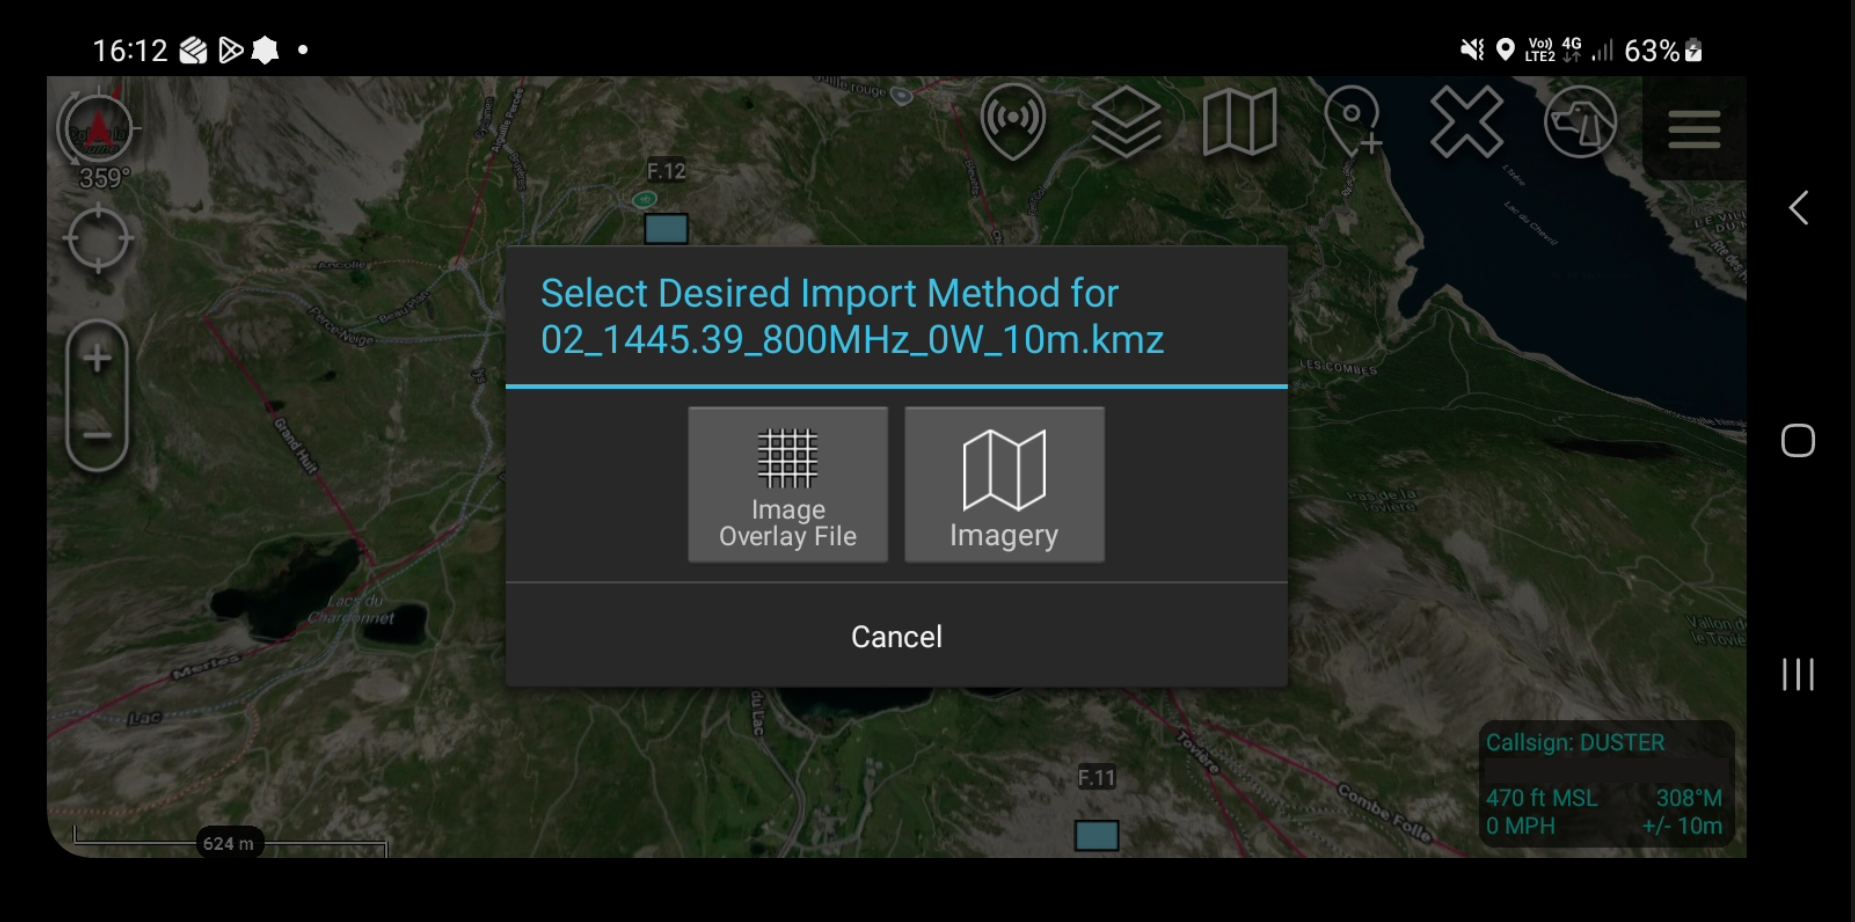
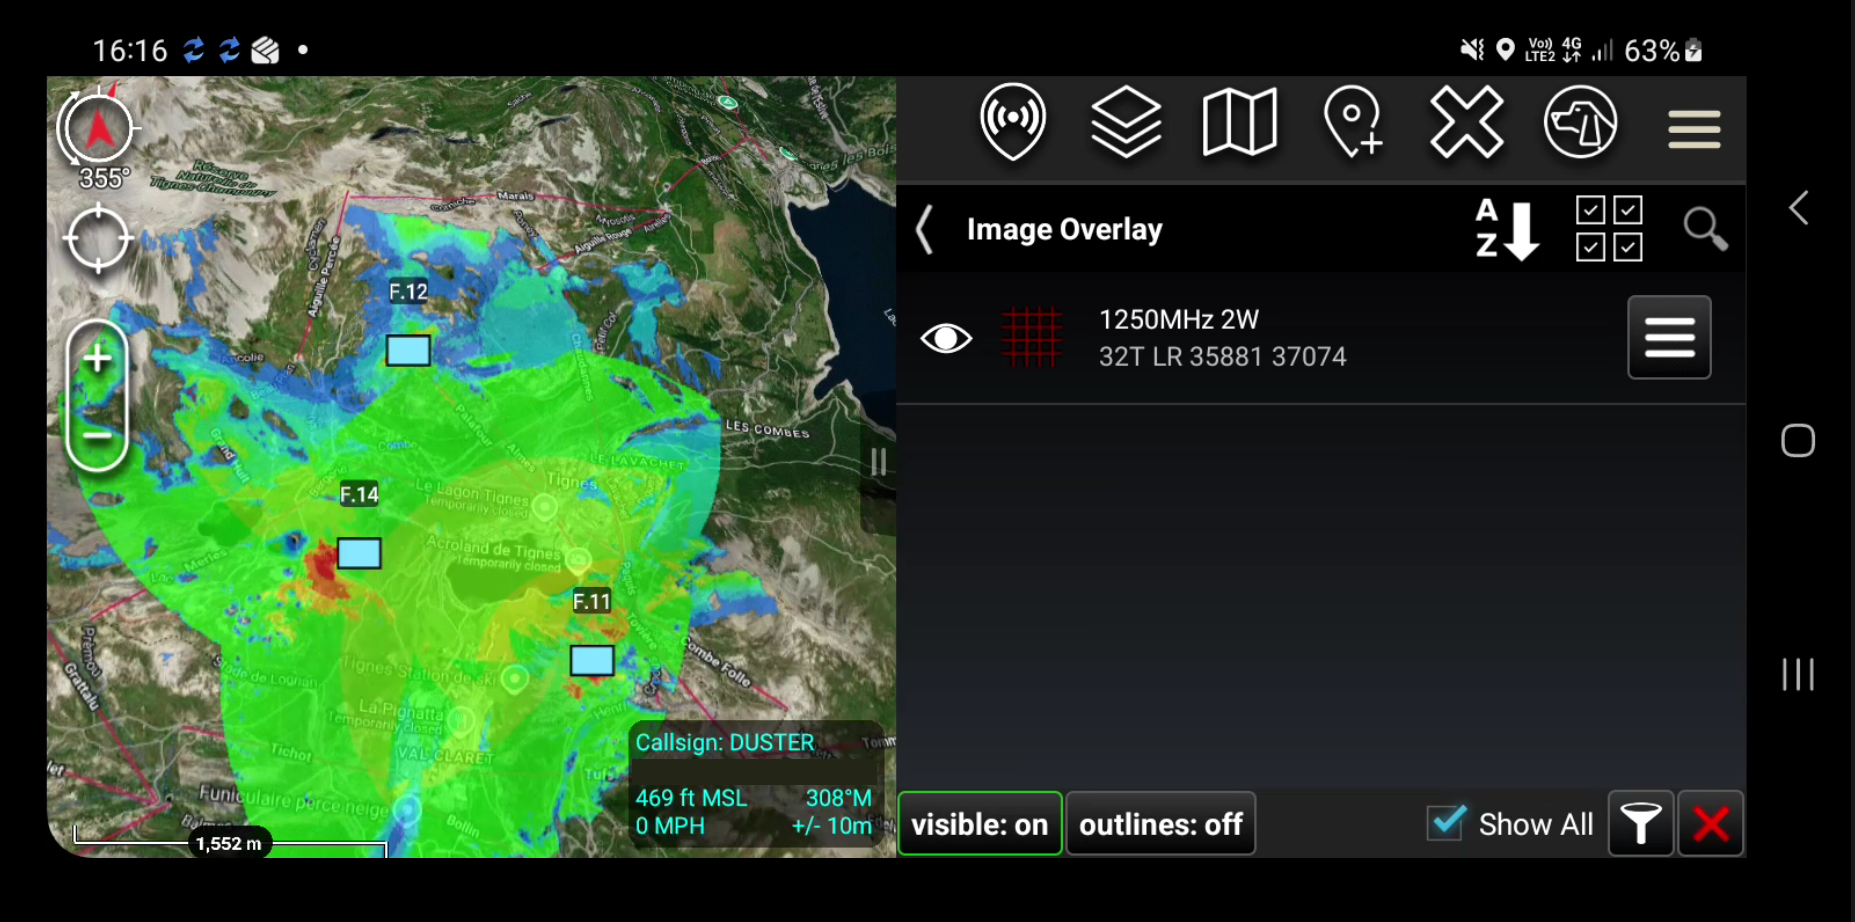
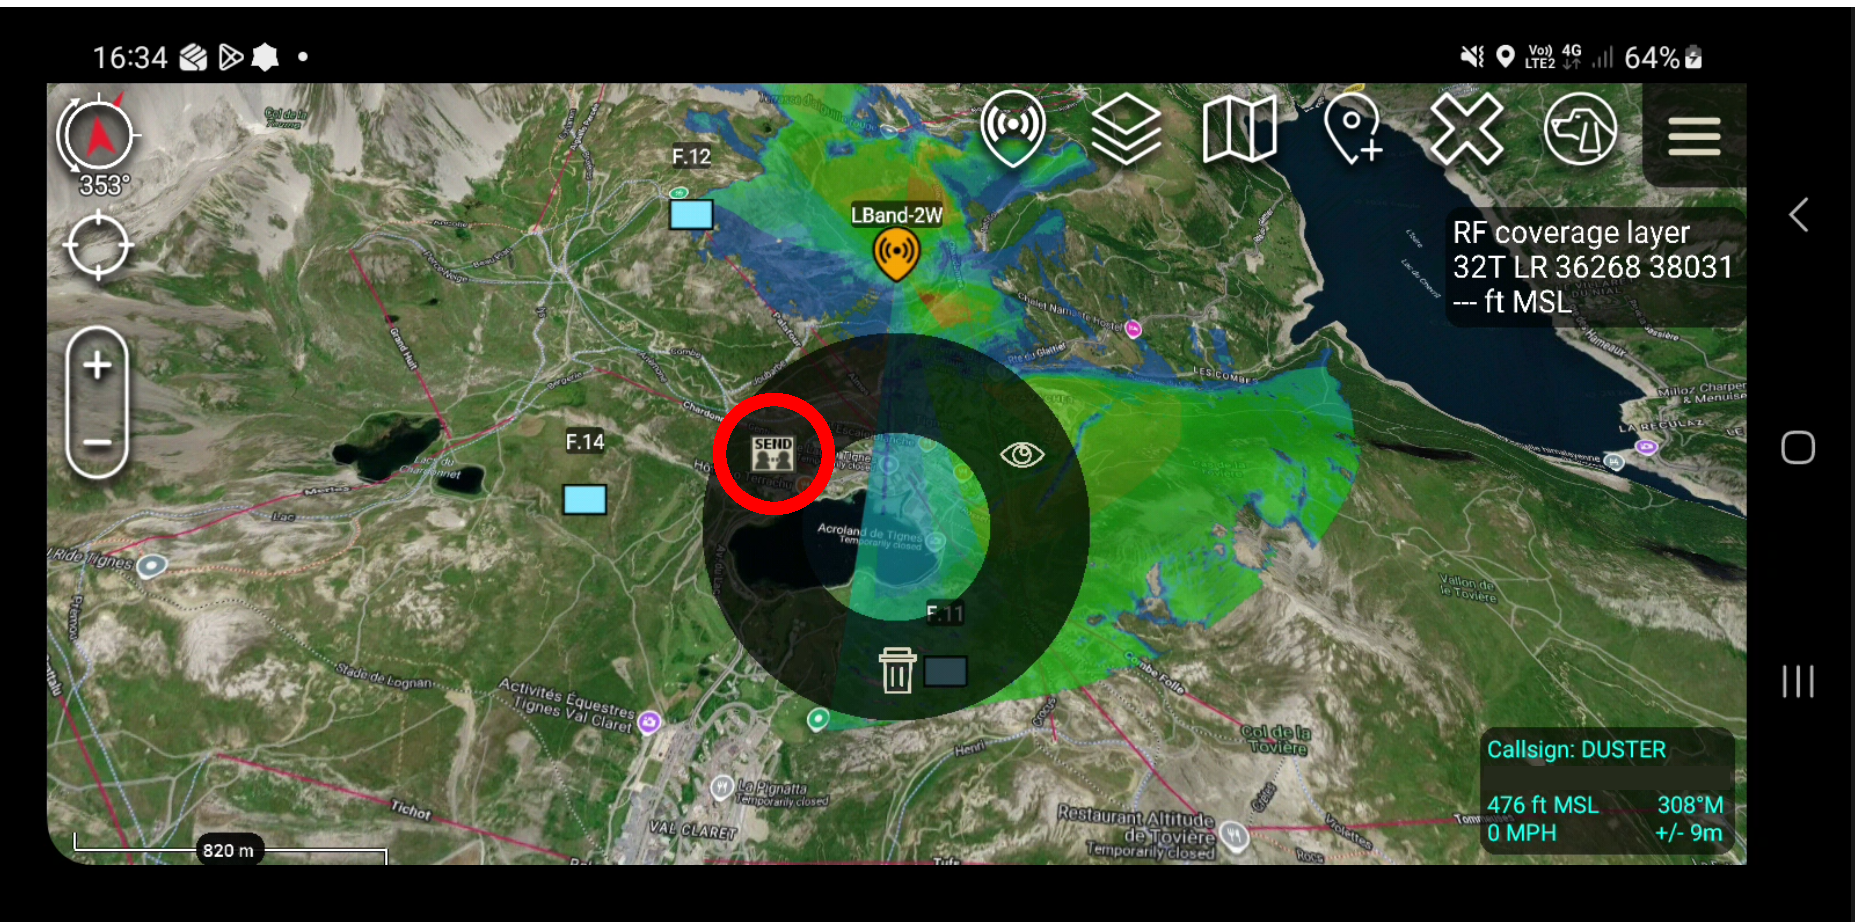
To send a KMZ to another TAK user, load it onto your map to validate it’s the right one. The layer can then be pressed and sent using ATAK;s native send functionality. The layer can then be sent to your Contacts or Groups on ATAK.
Soure code
The plugin source code is open source and available on Github.
URL: https://github.com/Cloud-RF/SOOTHSAYER-ATAK-plugin
We published it to help people develop capabilities for our API and also to check the behaviour of shady people and patent trolls who don’t like public commit logs.
If you want to report an issue or request a feature you can do so on the public issue board or in private via CloudRF support.